Wednesday, June 3, 2009

How to Clean a DSLR Sensor


Note: This is the second of a two part series on the care of DSLR image sensors. To better understand the subject, please start with Sensing Your DSLR Sensor's Condition.


Figure 1 - Hub's Canon D30 sensor test before cleaning

There is no doubt that my camera's sensor requires cleaning. Figure 1 shows the dust spots that were detected from the test procedure discussed in my previous post. I am not proud of my "dust collection", and the images it produces reflect its poor state of cleanliness.

Then what are the options for cleaning the surface of my image sensor?

1. My first and safest recommendation is to allow the manufacturer or a professional camera repair company tackle the tricky task. I asked one of the country's best repair organizations, Advance Camera of Portland, Oregon for a description and pricing for their sensor cleaning service.

The price for this service on a standard DSLR is $40. This includes cleaning the sensor's surface of dust, general camera cleaning and updating any firmware required to make the camera current. Companies like Advance Camera have trained staff technicians who perform this service daily and are well equipped to return the sensor to its original factory condition.

With this option, the risk of damage is placed on the company performing the service -- not you. If anything goes wrong, you are protected.

WARNING: The following options carry a heavy risk for the camera owner. In some cases, actions you may take to clean your sensor could void your camera's warranty or result in a much more expensive repair. Performing either of the following actions is done solely at the camera owner's risk.

Pretty heavy-duty warning. But we must be realistic and understand the potential for seriously damaging the sensor and/or the camera when any "do-it-yourself" method is attempted.

2. Use a "blower bulb" to blow off the dust.


Figure 2 -- Canon Blower Bulb

A blower bulb, like the one shown in Figure 2, is the second safest way of cleaning your camera's sensor. DO NOT use cans of compressed air. This product's propellant may actually "freeze" your sensor.


Figure 3 -- Light path cavity of DSLR with lens removed

Getting to the camera's imaging sensor is not as easy as taking off the lens. Immediately behind the camera lens is the mirror (shown in Figure 2) that reflects the lens image into the viewfinder housing. Behind the mirror are the curtains that make up the camera's shutter.

The sensor is behind the shutter. To lift the mirror and open the shutter curtains, DSLR camera manufacturers have included a special function on their cameras called "sensor cleaning". Look up "sensor cleaning" in your camera's manual to find out how to access this function on your camera.


Figure 4 -- The camera's sensor exposed when the "sensor cleaning" function is activated.
Ignore the temptation to touch the sensor.

Activating the "sensor cleaning" function will raise the mirror and open the shutter to expose the image sensor (see Figure 4).

Note: The sensor is covered with a glass filter. It is this glass filter that dust calls home -- not on the sensor itself. You will be cleaning this glass filter. Never touch this surface. You will transfer your skin oils and could scratch the glass surface.

In this position, the blower bulb can be used to blow off the surface of the sensor. DO NOT touch the sensor glass with the blower tip. Only the air from the bulb should touch the sensor.

That's it. Reset your camera's "sensor cleaning" function to normal, replace the lens and start shooting.

So, what's the catch? There are three potential problems with this cleaning approach:
  • dust that is "stuck" to the sensor's glass surface will probably not be blown away. Only loose dust will be removed.
  • using a bulb blower can actually add more dust to your sensor's surface. Dust that is located within the housing may be dislodged and fall on the surface of the sensor.
  • there is a remote chance that if you accidentally strike the surface of the sensor glass with the tip of the bulb and scratch the glass. In that extreme case, the camera must be sent in for an expensive repair.
The only way to know for sure is to try this procedure and take another test shot as described in the previous post. If you find that some dust spots haven't moved at all, then they are "stuck" to the surface of the glass and require a more drastic approach remedy.

3. Do-It-Yourself Sensor Cleaning Kit options.

Wouldn't you know it? As soon as DSLRs appeared on the market, some enterprising inventor began selling "do-it-yourself" kits for cleaning sensors. Knowing that my camera needed more than a simple "blowing off", I went to Pro Photo Supply in Portland, Oregon to find out which current products were the best value and safest to use.

I was shown Pro Photo's best selling and most cost effective sensor cleaning products -- both manufactured by Dust-Aid.


Figure 5 - Dust-Aid Platinum, Dry sensor cleaner

The Dust-Aid dry sensor cleaning uses no fluids to clean the sensor. Instead, the rubber stamp-like device uses a special cleaning silicon pad to trap the dust and remove it from the sensor's glass surface. The silicon pad is lightly touched to the surface of the sensor where it captures dust and is lifted with the pad. The system comes with cleaning strips that allow the silicon pad to be cleaned and reused indefinitely.


Figure 6 - Dust-Aid Platinum, Dry sensor cleaner pad is lightly tapped in the 4-corners of the sensor.

The process begins just like the bulb blower method. First activate the camera's sensor cleaning function. As shown in Figure 6 above, the pad is placed in contact with the sensor in each of its four corners. This placement allows enough overlap to clean the entire sensor glass surface. This device easily removes any dust that isn't "welded" onto the sensor surface. In many cases, this cleaning device and process may be all that's needed.

For the tougher jobs, like my D30, the wet sensor cleaner is the most appropriate "do-it-yourself" option.


Figure 7 - Dust-Wand Kit, Wet sensor cleaning

Using the Dust-Wand Kit (shown in Figure 7) is more complicated, but does a very thorough job. The kit comes with three soft plastic wands. The reason for three wands is to accommodate the three current DSLR sensor sizes. The wand is covered with a super soft swab that attaches to the wand. A special non-alcohol, non-flammable and fast drying liquid cleaner is then applied to the cloth-covered wand to clean the sensor's filter glass.

Here's how the process works.


Figure 8 - Attaching the cleaning swab to the plastic wand

The kit comes with detailed directions and diagrams for attaching the cleaning pad fabric to the plastic wand. Figure 8 shows my attempt at creating the "perfect" cleaning wand.


Figure 9 - Moving cleaning wand across the surface of the sensor's filter glass
  • Once the fabric is folded around the wand, a supplied plastic clip (red circle) holds it in place. The object is to make the top edge of the wand as flat and smooth as possible. It's this edge that will be in direct contact with the filter glass that covers the sensor.
  • Now it's time to activate the "clean sensor" function on your camera to move the mirror and shutter out of the way.
  • Apply 3 to 5 drops of cleaning fluid (number of drops is determined by which size wand you are using) to each side of the wrapped wand.
  • Place the wand in the lower corner of the sensor filter (yes, touching the filter) and gently move the wand across the sensor filter -- ONCE (see Figure 8).
  • Remove the wand from the camera and discard the wrapped cloth.
  • Wrap a new cleaning cloth onto the wand (using a new cleaning cloth ensures that no dust will be brought back to the sensor when the second cleaning pass is made).
  • Add 3 to 5 drops of cleaning fluid.
  • Place the wand in the upper corner of the sensor filter and gently move the wand across the glass -- ONCE. The overlap between the two cleanings will ensure complete sensor coverage.
  • Return your camera to normal shooting mode and attach lens.
Did it work? Figure 10 below shows the result of my sensor dust test after following Dust-Aids procedure with their Dust-Wand Kit.


Figure 10 - Result of sensor dust test exposure after Dust-Wand cleaning

It did work. Compare Figure 1 to Figure 10. It was a tense process, but my sensor hasn't been this clean in several years. The camera's like new and back in action again.

The cost for the Dust-Aid Platinum dry cleaning device is $29.99. The price of the more aggressive Dust-Wand wet kit is $39.99. This is about half the cost of other "do-it-yourself" products I've seen on the market. Considering it has been five years since my sensor was last cleaned, I calculate the 50 cleaning cloths that come with the Dust-Wand Kit will last me about 25 years. Kidding aside, there are ample supplies in these kits to last the average user several years.

I thought you might also enjoy seeing two worst-case, before and after examples of sensor cleaning that Advance Camera provided from their own archives. They are shown below as Figures 11 and 12.


Figure 11 - Before (top) and after (bottom) cleaning examples


Figure 12 - Before (top) and after (bottom) cleaning examples

One final example from Advance Camera is shown in Figure 13. In this case, the top image is the results of a customer attempt to clean his sensor. The bottom photo is the result after professional cleaning was performed on the sensor.


Figure 13 - Top image shows the streaked results of a "do-it-yourself" sensor cleaning
while the bottom picture shows the sensor after it was professionally cleaned.


I have also seen some suggestions that a vacuum brush is a sensor cleaning option -- like the ones that are sold to clean computer keyboards. I do own one, but I find that the brush bristles are very stiff. As a result, I worry about scratching the sensor's filter glass and haven't attempted this solution.

Of course, keeping your sensor as clean as possible to reduce the number of sensor cleanings should be the real objective. Here are a couple of tips to prevent dust from making a home on your sensor.

1. Always cover the mirror, shutter, sensor cavity of your camera. Usually a lens is attached to solve this problem. But when you don't have a lens attached to your DSLR, by all means, use the body cap that came with the camera. See Figure 14.


Figure 14 - Use the camera's body cap when a lens is not attached to your DSLR.

2. When changing lenses, face the body of the camera downward to prevent dust from falling into the mirror, shutter and sensor cavity. Dust doesn't usually fall up. See Figure 15.


Figure 15 - Switch lens with the camera body facing downward

Neither of these tips adds any time or cost to your photography, but they will help prevent dust from reaching the surface of your sensor.

One last warning: Sensor cleaning options 2 and 3 present risks that could damage your camera. With the initial investment of "doing it yourself" and having a professional perform the sensor cleaning being about the same consider which is most appropriate for your situation, skills and nerves. The cost of replacing a scratched sensor filter glass ranges from approximately $250 to $800 depending on which DSLR you own.

Sensing Your DSLR Sensor's Condition


Note: Although I consider myself photographically competent, I need to acknowledge the information and insights I received from two trusted photo industry friends as I researched these two articles on Camera Sensors, Tom Houston of Pro Photo Supply and Dave Sleeth of Advance Camera -- both organizations are Portland, Oregon camera stores. Each gentleman helped me develop this information in a manner that would be most easily understood by the community of beginning DSLR photographers who read my educational blogs.


Technologically, my Canon D30 has been eclipsed several times by newer models with greater resolution and up-to-the-minute innovations. But because it was my first professional DSLR and the comfort factor I experience with the camera, I continue to grab it whenever my work doesn't require extremely high resolution files -- like the images used on my Internet website and blogs.

I have taken this camera everywhere -- Spain, France, Alaska, New York and throughout the southwest U.S. to name a few. It has been exposed to virtually every climate and weather condition imaginable. Although I keep the camera and lenses clean and protected, I began to notice spots on my pictures. These spots were especially obvious when I was using a small aperture opening and the background was a smooth single color. Clear blue skies made these imperfections especially visible and distracting.


Entire Image


Enlarged section of original picture

Figure 1 - Eiffel Tower (Las Vegas version). Original on top. Enlarged version beneath.

The problem started with just one spot. I worked around the problem by "dust busting" my images in Photoshop using the "cloning" tool. Over time, these imperfections began appearing everywhere in my pictures and always in exactly the same places. Figure 1 shows how extensive the problem became. (If you can't see the spots on the pictures of the Eiffel Tower on the top image, the second image is an enlarged section of the same picture with the spots circled in red.)

I knew all along that the problem was dirt falling on (and sticking to) my camera's sensor. But, to me, cleaning my camera's super-sensitive sensor was akin to taking out my own appendix. I'm no surgeon, and this wasn't an operation I was looking forward to attempting.

This first article on camera sensors will provide you with the information for determining the "dirt status" of your sensor and deciding if your sensor needs cleaning. My next post will detail the options available for cleaning a dirty sensor. Nothing shown in this article has the potential of harming your camera or costing you anything, but the following procedure should be carried out occasionally to determine the state of your sensor.

Visually checking the "dirt status" of your camera's sensor is a simple process, but it does take a little time. The camera's imaging sensor is well hidden in a DSLR. It is located behind the mirror and then behind the curtains that make up the camera's shutter. Consequently, taking off the lens and looking inside the camera body does not allow you to see or inspect the sensor.

The easiest and surest way of checking your sensor is by taking a special test picture with your camera. Here are the steps:


Figure 2 -- Set up for taking sensor "test" picture
  • find a large piece of smooth, single-color cardboard or mounting board (11"x14" or larger will do) with a clean surface
  • make sure you have a data storage card in your camera
  • set up the camera to take a picture of this board. (Figure 2 above shows my set up using a tripod to hold the camera
  • place the camera in Manual Focus mode and set the camera's focus ring to infinity (when looking through the camera's viewfinder, the now "out of focus" piece of board should fill the entire image area)
  • set the camera to Aperture Priority mode and use an f/stop setting of f/16 (high degree of depth of field)
  • allow the camera to make the automatic meter reading and take the picture
  • while you're at it, shoot a couple extra -- just in case.
Now you have one image file (and two back up files) of nothing but out-of-focus "blank". Download these files to your computer. Here's the picture result of the test shot using my D30 DSLR:


Figure 3 -- Original sensor test picture


Figure 4 -- Same as Figure 3, with dust spots circled in red.


Figure 5 -- Sensor test picture after applying Photoshop "Equalize" function

Figure 3 is the "straight out of the camera" image as seen in Photoshop. At the picture size in this blog, it might be difficult to locate the dust spots on your monitor. So, in Figure 4 I circled the dust spots in red. Figure 5 uses a command within Photoshop called "Equalize". (The Equalize command redistributes the brightness values of the pixels in an image so that they more evenly represent the entire range of brightness levels.) Although it's not important here to understand how Equalize works, the results when applied to this test are dramatic. The dust that sits on my camera's sensor is readily apparent in Figure 5, and more prevalent than I was able to identify in the red circles of Figure 4.

(If you don't have imaging editing software, like Photoshop, with an Equalize function, no problem. Try increasing the contrast levels in your software. This will help. But as Figure 4 demonstrates, you'll be able to see if there are large spots of dust on your sensor even without special image enhancement.)

Conclusion: Hub has a very dirty camera sensor.

The next post "How to clean a DSLR sensor" will tackle the problems and dangers of cleaning a dirty sensor as well as the steps you can take to minimize dust reaching your DSLR's imaging sensor.

In the meantime, get ready for the next article by performing the simple test above to see the current condition of your sensor.

Sunday, May 24, 2009

Guidelines for Purchasing Your First Digital Single Lens Reflex (DSLR) Camera


For the first-time DSLR camera buyer, the choices and options can be overwhelming. Here's a list of questions and considerations for making that big decision. A good camera store will ask the same questions to help determine which cameras are the best fit for their customers. Unfortunately, when shopping on the Internet or at mass merchandisers, little or no expert advice is available. So, answer the questions in this list, and take the list with you when you shop for that first DSLR.

Preface -------------------------------------

1. It is not the camera that makes the photographer. Any modern DSLR can take a good picture. It's the photographic knowledge, insights, time, patience and practice of each photographer that ultimately defines their personal style and the artistic merits of their photography.

2. All major DSLR camera manufacturers produce cameras that take excellent pictures. Whether it be Nikon, Canon, Sony, Pentax, Olympus, etc., each manufacturer is driven by customer demand and the ever-present pressure of competition. Consequently, you can be assured that each camera manufacturer offers a camera model presenting similar quality, capabilities and features within your budget range.

3. Be financially realistic. Making the decision to "move up" to DSLR photography carries considerable financial implications. This is true of almost any hobby or interest that we pursue in greater depth or take to the "next level". Photography can be expensive and, for newcomers, is rarely limited to just the purchase of a camera. I also caution first-time buyers that cheap usually signifies low quality. Over and above the initial cost of the DSLR camera body/kit lens, batteries, battery charger and memory card(s), typically the entry fee into DSLR photography will also include the following purchases during the first few months of ownership:

  • A tripod. (An adequately sturdy tripod will generally fall in the $80 to $200 range.)
  • Extra lenses. Most newcomers will buy a DSLR together with a lens (called a kit lens), but it's also common for DSLR owners to purchase a second or third lens to increase their photographic options (set aside $200 to $500 for each of these extra lenses).
  • UV filter(s) to protect the front glass (element) surface of each lens (a good quality UV filter will cost $30 to $50).
  • A camera bag -- for both convenience and protection reasons (expect to spend $50 and up for this important accessory).
  • (Optional) computer software to post process your images. Some digital imaging software can be found as freeware on the Internet. These programs are often a "good place to start." If you buy a commercial program like Photoshop Elements or Photoshop CS4, expect to spend $75 to $700.

There are hundreds of accessories you could and might purchase, but the list above identifies the items most often purchased at or near the time a DSLR is purchased.

The Checklist --------------------------------------

1. Determine whether photography will be a serious pursuit or possibly a passing fad in your life. If your interest falls into the "fad" category, save money and buy an inexpensive or even used camera. If you decide later that photography has become a serious passion, you can always move up to a more sophisticated DSLR camera.

2. Determine a budget for the new camera. This will automatically narrow your search and define a group of cameras to evaluate. As discussed above, be realistic and make sure the budget takes into account any accessories you will include with the initial camera purchase (such as camera bag, tripod, filters, extra lens, etc.).

3. Determine the type of photography that most interests you. This knowledge will help determine the features that you "MUST" have in your new camera as well as the accessory equipment you should consider purchasing (such as lenses, tripods, etc.). For example, the requirements of landscape photography are much different to those of portrait photography or macro photography. Know where you want to start your photographic experience.

4. NEVER buy a camera without first TRYING IT OUT! Don't be in a hurry. Go to your local camera shop and "handle" all the cameras in your established budget. Which one "feels" best and easiest FOR YOU to use? Remember, you have to live with this camera. It should "feel" comfortable in your hands and to your eye. There is a size and weight difference between what is comfortable for men and women. (Husbands and wives: Keep this in mind if you are considering buying your spouse a camera. In fact, a DSLR camera purchase is so personal that I suggest gifting the money, thus allowing the new photographer the freedom to select his or her own camera.) In addition, establishing a relationship with a good, reputable local camera shop and their staff will prove beneficial for as long as you are into photography.

5. Read the "Camera Review" section on photo forums and in photo magazines. This will provide you with some (usually expert) opinions regarding the technical merits of each camera you are considering.

6. Check out the Internet forums, go to local camera club meetings and ask friends who have the same photographic subject interest as you to see what equipment they are using. This research will probably spotlight two or three cameras in your price range.

7. Prioritize a list of camera features that you want on your new camera. Do you need aperture priority, external flash capability, depth of field preview, high rate of shots per second, water resistance, diopter adjustment to match your eyesight, etc.? Take this list with you when you go to the camera shop. If these terms are unfamiliar to you, seriously consider spending more time studying the fundamentals of photography. Internet sites like Hub's Camera are FREE and designed to give beginners this grounding in the basics of photography.

8. Don't get caught up in the megapixel race. This is especially true if you will seldom make pictures larger than 8"x10". Any camera from 6 megapixels and up can produce an exceptional 8"x10" enlargement. In reality, there is no noticeable quality difference between, say, a 10 megapixel camera and a 12 megapixel camera. It's certainly not necessary to purchase the camera with the most megapixels to create stunning pictures -- especially if the majority of your picture-making requirements fall within the typical picture size range of 4"x6" to 8"x10", or if your intent is only to share your photography online.

9. When you've narrowed down your choices to two or three, go to the manufacturers' websites and download the electronic version of each camera manual. Read through the manuals to ensure that all the features you require are present and that you understand how the camera is operated.

10. Remember: Once you purchase a camera, you are -- to a large degree -- "locked" into that particular manufacturer's camera line up. You can always buy up to more sophisticated or new models from that manufacturer. But, because each manufacturer has its own proprietary lens mount, you cannot use your lenses on another manufacturer's camera system. You will have to replace the camera and ALL of your lenses to make a manufacturer switch -- an expensive proposition.

11. Know your camera seller. Buy from a reputable dealer whom you trust, and who has a history of good customer support AFTER the sale. If you are fortunate to have a good camera shop in your area, support their business -- especially in the current economy. They will return the favor by becoming your trusted partner in photography. Nothing is more frustrating or demoralizing to a camera shop employee (and owner) than to spend hours answering customer questions and freely providing their expertise, only to have the customer go to a mass merchandiser or an Internet camera discounter to make the final purchase.

12. Once you've purchased a camera, save yourself months of pain and frustration. READ the manual. I am constantly amazed by the number of questions asked on forums that could be easily and quickly answered by reading the camera's manual. Take the time. Read the manual. Join a camera club. Sign up for a photography course at a local university or community college. Participate in a forum where you can share your pictures and receive constructive criticism. Do something that places you in a "hands on" learning environment. You'll not only learn the "ins and outs" of your camera, but you will meet others in your area who are either experts you can trust or fellow photographers at your same skill level. Misery and learning loves company.

You are about to enter one of the most enjoyable and artistically rewarding avocations on the planet. Maintain your sanity and your pocketbook. Make informed and educated equipment decisions.


Wednesday, March 11, 2009

New Book Pick - "The Joy of Discovery" by David Saffir


Looking for that unique gift for the photo fanatic in your life? Then David Saffir's newest visual stunner -- "The Joy of Discovery" -- should be at the top of your list. This "celebration of my journey in photography" vividly illustrates David's keen eye for capturing the photographic art that's hidden within every location. Finding those image "treasures" may be well planned and require extreme measures, like being on location at 4 a.m. to catch a moonlit scene at a cliff's edge, or it may be the happy coincidence of timing.


For any photographer who believes that travel to exotic locations is a fundamental requirement of successful photography, you need only browse David's images to realize that beauty is found everywhere. It's the exercising of imagination, craft and style that should be your focus.

Some of David's images may look familiar, but they all have his special touch that make them uniquely Saffir images. His mastery of lines, tone and mood is evident in this book's broad range of subjects and is a delight to any viewer's eyes.

Be sure to include David's "The Joy of Discovery" on your photo bookshelf. Visit his website to see several preview pages and for ordering details.

Sunday, March 1, 2009

Hub's Pick - The SLIK Pro 330EZ Tripod

One of the biggest mistakes a serious beginning photographer can make is to cut corners when purchasing a tripod. Tripods range in cost from about $20 to well over $1,000. The temptation to save money and buy a cheap tripod is understandable, but, in the long run, a waste of good money. Cheap tripods don't provide the stability, durability, camera safety and flexibility photography requires.

I have had my Gitzo tripod for more than 25 years. It has become a friend and my stable photography platform. During this time, I have learned to operate it with my eyes closed. The one problem with my tripod is weight. At about 12 pounds, my Gitzo provides a workout every time I go into the field.

For this reason, I would not recommend my tripod to beginning photographers. (Or to me as a field tripod for that matter.) The recent industry trend in tripods is lightweight and sturdy. To that end, many manufacturers have taken to producing ultra lightweight tripods based on carbon fiber technology. When I started this investigation, I was immediately hit with "sticker shock". They ain't cheap. Even smaller carbon fiber tripods start at $250 and if I needed a larger unit, it could eventually cost more than the camera it was made to support. (By the way $250 was just for the tripod. I would need to add a separate tripod head to have a functioning tripod. Add another $100 plus.)

This isn't the value I was hoping to bring to my readers. We don't require space-age, stealth technology that will outlive the pyramids. What we really need is a semi-light, flexible, extremely stable and affordable "take everywhere" tripod. Serious beginners want to take landscapes, portraits, still lifes, night shots, wildlife and be able to do some experimenting with techniques like HDR photography.

So, I decided to follow my own advice and talk to the people I trust most - my local professional camera dealer. In my case, that means a trip to Pro Photo Supply in Portland, Oregon. The pro I found waiting for me was Tom. I told him I was about to write an article for my readers on tripods, and that I needed his advice on a solid but budget-friendly option for serious beginning photographers.

There was no hesitation. Tom led me directly to the store's tripod display and handed me the SLIK Pro 330EZ tripod. The price was extremely reasonable. I have found this tripod priced between $105 and $120 (Manufacturer's suggested price is $179). Best of all, Tom let me take it for a working "test spin". So that's what I did for the next 10 days.


Opening the box, I was pleasantly surprised to find that everything came with the tripod. I didn't need to buy any accessories (as if a tripod head could realistically be called an accessory). The tripod ships with:
  • tripod (with soft-foam covered top legs)
  • a two-piece tripod column and pan/tilt head
  • two bubble levels incorporated
  • quick release camera mount
  • instructions
The Pro 330EZ is not made with carbon fiber, but the next best thing - super titanium alloy. This gives the little guy excellent strength and noticeably light weight.


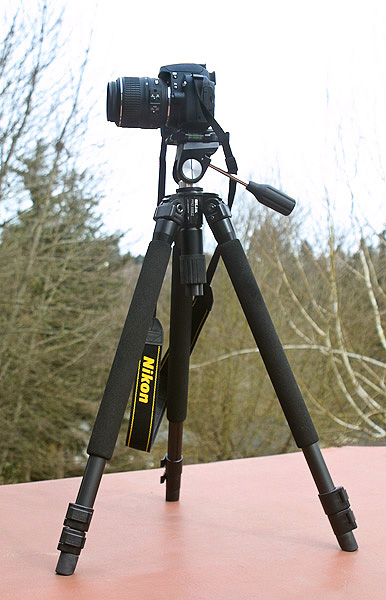
The unit weighs in at 4.4 pounds (including the head) and when collapsed it's a mere 24 inches long. Doing some research I found that an equivalent carbon fiber tripod would only weigh an ounce or two less. Since I was concerned about saving pounds, an extra ounce didn't seem like too much of a sacrifice to save a couple of hundred dollars.


The included camera quick release device attaches to any standard camera tripod socket, making set up and tear down a snap.


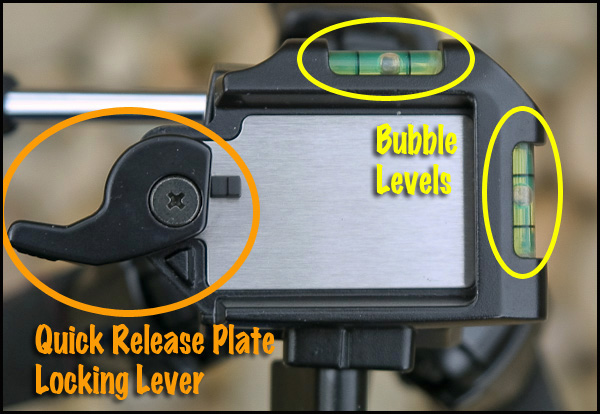
With the release device attached, the camera slips onto the tripod mounting plate, snaps into place and is secured by the quick release locking lever shown above. From this angle you can also see the two bubble levels. Extremely handy when attempting to level the camera for horizons, panoramas or any vertical/horizontal elements in the composition.

With the camera mounted, how stable is the unit? I'm pleased to report that this tripod is extremely stable at all heights. I felt my camera was as secure and stable as it would be on my trusty old Gitzo. Even normal bumping of the tripod didn't cause it to tip or fall in any of the configurations I used.


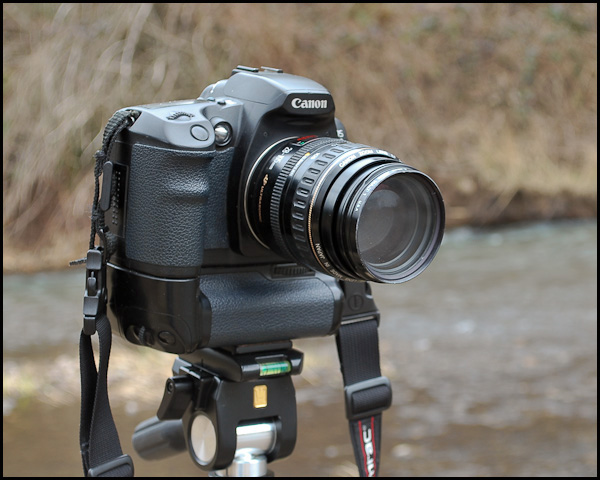
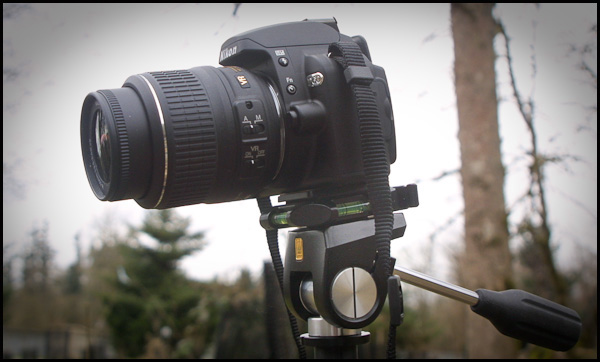
With either size camera the bubble levels are clearly visible for fine adjustment

I used the Pro 330EZ with a Canon EOS (with extra battery compartment accessory) and a Nikon D60 (considerably smaller than the Canon). Both cameras were held securely and without any "top heavy" tendencies or vibrations. SLIK rates the tripod with an 8 pound load capacity. More than enough to safely support a camera and long telephoto lens.


Vertical pictures can be easily accommodated by loosening the platform locking knob and horizontally rotating the camera 90 degrees. Then use the tilt and pan handle to move the camera to the desired vertical position. Very quick.

But the real story behind the Pro 330EZ is the flexibility it provides the photographer.


Each tripod leg has two extension sections that are quickly released and positioned with quick snap leg locks. Fully extended (including the head column extended) the tripod is 48.4 inches high.


The quick release leg locks and smooth action of the leg segments make set up in even the most complex and rugged situations quick and easy. In this set up, the front leg was at full extension as was the center column. And the camera remained rock steady during the long exposures used to create flowing-water motion in the nearby stream.

But that's only the beginning.


At the joints where each leg connects to the center column support, three two-position leg locks allow the angle of the legs to be altered in 2 steps to allow the tripod to conform to unusual shooting situations or a lower camera for unique perspectives.


In the picture above, the leg locks were adjusted to the most extreme angle and the column was raised to allow a lower shooting angle.


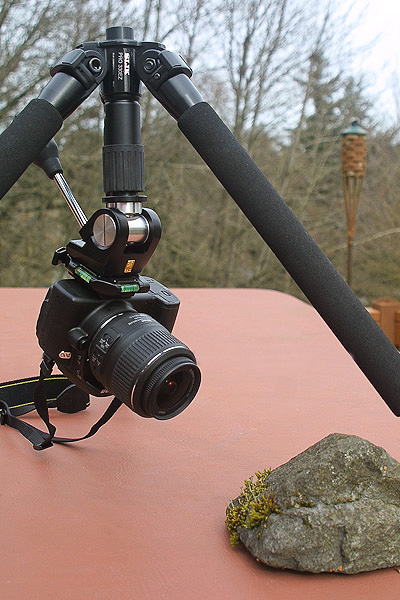
Since the center column is made of two pieces (as shown above), one section can be removed to allow an even lower camera position.


In the above picture, the lower section of the center column has been removed to allow an extremely stable camera platform and low perspective. In this lowest position the top of the camera mounting plate is a mere 11 inches above the ground. Pretty cool.

Need to get even lower and closer?


Then reverse the column and lay on your stomach. It takes a while to get used to shooting "upside down", but -- as you know -- a good macro shot is well worth the effort.

Without a doubt, it's mass production that helps keep the cost down on the SLIK Pro 330EZ. But the solid build, fit & finish, smooth operation, flexibility and quick operation of this tripod shouts "professional". It may be considered the low end of the professional line, but don't tell the tripod. It acts just like its big brothers.

Its size and weight are a joy. It easily fits into a backpack or suitcase. Most importantly, a photographer can carry this tripod all day and never notice its 4.4 pounds.

So, my friend Tom at Pro Photo Supply had good reason to point me to the SLIK Pro 330EZ. This "everything's in the box", durable and infinitely flexible tripod is a winner.

As a matter of fact, it's now mine.

Powered by ScribeFire.