But there are processes and styles of photographic imagery that pass in and out of favor on a fairly regular basis. Black & white photography is a good example. It all began as black & white images when photography was first invented. Then color entered the scene and was popularized by the introduction of Kodachrome by Eastman Kodak in the 1930s. In the 1970s, black & white emerged once again in strong fashion, but eventually receded to a less respected position. Today, black and white is enjoying a well-deserved resurgence as photographers rediscover the medium. Software makes accurate color to black & white conversion possible, and the unique artistic qualities of black and white images are once again being appreciated.
Infrared photography has that same cyclic nature about it. But unlike black & white software conversion, digital images which have been converted to mimic infrared film have been a disappointment. The nature of real infrared film has been an elusive goal to digital photographers. Yet there is something about the delicacy and fragility of the fantasy-like pictures born of infrared photography that compels photographers to continue seeking a solution in the digital environment.
Using infrared film was a tricky proposition. Because the camera metering of infrared light was impossible, the results were never known until the film was processed. The only solution was bracket, bracket and more bracketing. Somewhere in that maze of bracketed images there had to be a printable negative. Then there was the dense red filter that was required to make the exposure. Reasonable depth of field required long exposures even on a bright sunny day.
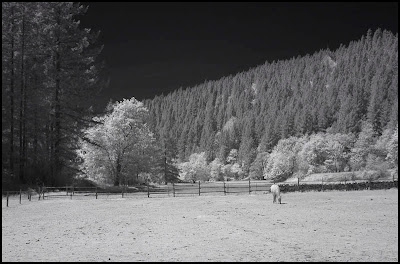
But, when successful, the results could be stunning. Shown in Figure 1 is a picture taken with Kodak infrared film during my "Infrared Period" in the mid 70s. Certainly, the style is not everyone's "cup of tea", but for many photographers, shooting with infrared film was an eye and mind opening experience.
For DSLR owners, several IR plug-ins have been available for programs like Photoshop and Lightroom for some time. These effects are applied to a normal digital image in post-processing. But none of these post-processing options have approached the true "look and feel" of a traditional infrared film image.
It has been possible for several years to modify DSLR cameras to record only the infrared portion of the spectrum. Problem solved? Well, yes and no. It's correct that the conversion allows true infrared photography, but the action also renders the camera useless for conventional photography. Only recently did I have a spare DSLR available to attempt this conversion. It was Advance Camera in Portland that afforded me the opportunity to request this surgical step. Having a local expert in IR conversions gave me the confidence to take the plunge.
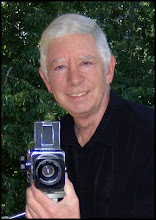
Dave Sleeth at Advance Camera became my IR guru. The victim of my decision was my trusty old Canon Rebel camera (Figure 2).
Dave began by giving me all the necessary warnings:
- the camera will no longer be usable for flash photography
- the metering system will no longer be perfect
- since all lenses focus IR differently, the photographer will need to use the diaphragm (depth of field) to assist in focus control.
But most of these concerns are offset by the fact that the image can be seen immediately on the camera's preview LCD and adjustments can be made on the spot. And flash photography was not one of my requirements.
Customers can select the level of IR they want to enter the camera by specifying which IR filter to install (resulting in images with some color to pure black & white). I selected the 800nm filter. This filter produces a very black and white image. The same look as the film I am trying to mimic.
The cost of the conversion is $245 regardless of the IR filter selected. At the same time, the camera is given a thorough cleaning and check up. The camera is also checked with a variety of lenses to check IR focus. The whole process takes only a few days.
I have to say that the results have been amazing. I am able to produce images that are very similar to traditional infrared film. I've also discovered some other pluses with this conversion:
- the results are immediately reviewable on the camera's LCD
- all my lenses are "tack sharp" -- no focus problems have been encountered
- the histogram still provides all the gamut information I want
- the absence of a dense red filter makes hand-held exposures at smaller aperture settings possible
- I return from shooting sessions knowing that the picture I wanted is on my data card.
Here are a few of the first shots taken with the IR converted Canon Rebel camera:

©2009,tehubbard, all rights reserved
I decided to push the envelope and attempt to construct an HDR picture in a scene with an unusually high dynamic range. The picture below is composed of 3 exposures (each 2 stops apart) and produced as an HDR image using Photomatix Pro. It worked!
Infrared photography is not for everyone, but for those who like to stretch the limits of photography and explore new creative techniques for expressing their art, IR photography presents a truly unique tool and a rare perspective on the world around us. But be sure to find your own guru to guide you through the conversion process. Better yet, I'll share my guru. Just give Dave a call. He services the cameras of photographers from around the world.
All in all, I am very pleased with my decision to convert my Rebel to IR. Thanks to Dave Sleeth and his crew at Advance Camera, I'm back in the 70s and enjoying every minute.


5 comments:
wow - first of all great blog. there are some really useful detailed post on here - some great things for amateurs and pros alike to learn.
would you mind if i added a link to one of you posts on my site?
Thank you for the kind words. You are welcome to link to my posts as long as you provide credit to my blogs.
the HDR woods pic is simply sublime!
Wow, amazing photos! Last fall, our wedding photographer provided us with several infrared photos and I love them. I have been learning about photography myself now and was trying to figure out how she got those photos.
I saw some infrared filters (that screw on to the end of the lens) for sale. Did you try that method as well before you converted your extra camera?
Thanks! Great photos again. Stunning!
Thanks to everyone for your comments and support. They are greatly appreciated.
Sara: Yes, I have tried filters, but - to me - they don't have nearly the same visual impact.
Post a Comment