Sunday, December 7, 2008

Shooting Tip - Christmas Light Displays

Seems to be a good time for a seasonal photography tip. Millions of pictures will be taken this holiday season to memorialize the creative light displays of dedicated (and occasionally fanatical) artists of the Christmas bulb. Situations like these often result in disappointing pictures due to the unusual light conditions.

My list of equipment and settings for this discussion includes:
  • Tripod: to stabilize camera during long exposures
  • ISO: 100 to minimize digital noise and maximize image detail
  • Shooting Mode: Aperture priority to control depth of field.


Lighting display pictures present some interesting photographic problems.

The picture above is typical of the results in these unique lighting environments. Although the scene has been captured, the highlights have been overexposed and contain no details. The result is the visual "fusing" together of the individual lights that make up the display.


Individual lights are indistinguishable and detail is lost
(ISO 100, 4 seconds, f/8, aperture priority mode)

The picture above is an enlarged section of the first image. Notice the lights that provide the detail in Santa and the snowman have merged to produce an over-exposed mass of white.

The metering problem is created by the amount of dark area in the scene and the extreme intensity of the display lights (the scene's high dynamic range). The camera's metering is attempting to provide an exposure setting that will produce an overall exposure value that is equivalent to 18% gray. In most cases, the amount of dark area is greater than the light areas and has the greatest influence on the camera's metering system. As a result, the camera determines settings that over-expose the display lights.

The goal should be to distinguish the individual lights that make up the scene.


Exposing for the lights reveals the details in the display
(ISO 100, 1 second, f/8, aperture priority mode, -2 stops of exposure compensation applied)

The picture above has been exposed for the display lights. Notice that the individual lights and their colors are now distinguishable. The strings of lights have also provided enough illumination to allow some of the house details to be seen and add structure to the image.


Close up of properly exposed Santa and Frosty
(ISO 100, 1 second, f/8, aperture priority mode, -2 stops of exposure compensation applied)

Now the individual lights and their colors are visible to give the image the details in the displays and colors of the season. I elected to intentionally under-expose the image by 2 stops using the camera's exposure compensation control. How did I settle on 2 stops?

I used a combination of camera feedback:
  • The camera's preview screen. Watching the preview image I was able to see the results of each trial exposure and "see" the impact of exposure compensation changes. I was looking for the setting where the individual display lights became recognizable.
  • The camera's histogram. By watching my preview image and ensuring that the curves were not pushed too far to the right border of the histogram.
Here are two more examples from the house next door:


Again, the individual lights are indistinguishable and detail is lost
(ISO 100, 4 seconds, f/8, aperture priority mode)


Exposing for the lights reveals the details in the display
(ISO 100, 1 second, f/8, aperture priority mode, -2 stops of exposure compensation applied)

Notice anything? The exposures for this example are exactly the same as the first example. The point is that there is much similarity between displays. The exposure settings determined for one display become an excellent starting point for others.

A couple of final thoughts:
  • There are many ways of taking these lighting display pictures. Other photographers might have elected to use a high ISO setting (in the range of 1,000 to 1,600 for example). This is a very workable suggestion when you don't have the luxury of using a tripod and must hand-hold your camera. These higher ISO settings will provide faster shutter speeds. At the same time, just be aware that "noise" will become more apparent as the ISO values increase.
  • Snow is your friend. Unfortunately, in my area of the country, snow seldom falls during the holiday season. If you are lucky enough to shoot holiday displays with snow on the ground, you will be the beneficiary of additional fill light that is being reflected from the snow. This provides more structure to the picture and, obviously, more of the appropriate holiday mood.
  • It is possible to go overboard in the quest to make the individual lights distinguishable. I prefer to find an exposure that still provides some detail in the house and/or landscape to give the picture more structure. The picture below suffers from too much compensation and a lack of structure:

Over compensating for the lights reveals the details in the display but loses the structure provided by the house.
(ISO 100, 1 second, f/8, aperture priority mode, -3 stops of exposure compensation applied)

I hope this short discussion helps make your holiday pictures more successful and enjoyable.

Happy holidays from Hub's family to yours.

Monday, December 1, 2008

GPS Metadata For Your DSLR

It's becoming increasing popular to include location shooting information (GPS) in digital image metadata. Being able to insert GPS information with each digital image file ensures that the orignal location can be identified and shared in the future. Since the major camera manufacturers don't include this capability as a "built-in" function on their latest generation of DSLRs, there has been an increasing number of DSLR GPS solutions appearing on the Internet.

Many of these products rely on synchronizing the device's internal clock with the camera's timing circuit. These units are NOT attached to the camera and track your physical location while you're shooting by keeping a log in memory. When you return from your day of shooting and download your pictures, the software that comes with the GPS devices then writes the GPS coordinates into each image file based on the time recorded in the metadata of each image.

To this aging brain, this process seemed overly complex and easily corrupted if the times were not synchronized or something went wrong with either clock. I couldn't understand why a GPS device couldn't be attached to the camera and the GPS data be written to each image AS it was being shot. This would reduce the complexity to making sure the unit was attached to the camera and turned on.

Well, I found one. At least, I found a rugged unit that is designed to work with most Nikon cameras and Fuji's Pro S5. Since I'm a Nikon user for a good part of my work, I was delighted.


Geomet'r GPS Receiver

The unit is offered by Macsense and is called the Geomet'r GPS Receiver. It's about the size of an Apple Shuffle player. Best of all it attaches easily to the DSLR and has only one, non-confusing on-off button. The cost of the unit is $150. I ordered and received the unit within 5 days.


Geomet'r GPS Receiver attached to a Nikon D200

Shown above is the simple attachment of the GPS receiver to the accessory socket of a Nikon D200 (red circle). The on-off button is located on the socket connector (yellow circle). The unit also includes a velcorized bracket for placing the unit on the camera's flash shoe. I have gotten into the habit of attaching mine to my camera strap.

OPERATING INSTRUCTIONS: Turn on the GPS Receiver. Give the unit about 30 seconds to figure out where in the world it is currently situated. Take pictures.

That's it. As each picture is taken, the GPS location coordinate data is included in the metadata automatically.


Lightroom Metadata Window

Shown here is the metadata portion of Adobe's Lightroom Library workspace. The GPS and Altitude information were entered into this image file when the picture was taken (red box). The GPS data is now permanently embedded information that will always travel with the digital file.

Notice the small arrow at the right side of the red box. Click on this arrow, and here's what you'll see:


GPS Image Coordinates Shown in Google Maps

That's right. Google Maps opens in your browser to show you the exact location of the coordinates recorded in the image metadata.

How cool is that?

Now any picture service that makes use of GPS metadata (like Flickr) will be able to display the location where the picture was taken. Send your best vacation or creative photographs to members of your family, and they will be able to see your pictures and the location.

Things you need to know:
  • The Geomet'r draws its power directly from your camera's battery. This requires you to charge your batteries more frequently or carry spares. When not in use, TURN THE UNIT OFF or it will continue draining your battery.
  • Like any other GPS unit, the Geomet'r will not work reliably inside a building. In these cases, I take a picture of the outside of the building to have one image from the session with the exact coordinates. I can add this GPS data to the indoor images later in my digital editing program.
I have found the Geomet'r to be extremely accurate, reliable and rugged. So, if you have been looking for this capability and own a Nikon or Fuji DSLR, check out the Geomet'r.

Footnote: As of this post, Nikon has announced an accessory GPS unit similar in size and function to the Geomet'r called the GP-I. However, the pricing information is not readily available. I have seen price estimates ranging from $200 US to $800 US.

Thursday, November 27, 2008

Table of Contents

Sunday, November 9, 2008

Proportions in Photography

Proportions have always been a source of confusion for beginning photographers. The confusion is apparent in the questions I'm frequently asked at seminars and workshops:
  • Why can't I make an 8x10 print from the picture I took?
  • I enlarged my original image file to 8"x10", and now it looks funny. What's wrong with my camera?
Well, there's nothing wrong with the camera or the computer editing program. It's all about proportions. In these cases, physics dictates that some things just can't be done.


The DSLR image format

The picture above illustrates the full format of most DSLR cameras. As the picture is taken, it is ideally proportioned to produce a 4"x6" print that contains the ENTIRE image. In ratio terms, that's a 2 to 3 relationship between the height and width of the print.

Any print that violates this 2:3 relationship will be a distortion of the original image. That's worth repeating. Any full-frame print you make from the camera's original digital file whose sides are not in the ratio of 2 to 3 will not be a true representation of the image you saw through the viewfinder.


Enlarging a 4x6 print to 8x12 (the height and width dimensions are enlarged by the same factor)

Here's an example of an enlargement that is proportional to the original image file. Increasing the size of a print from 4"x6" to 8"x12" is proportional and will not be distorted. The clue is: If you increase both dimensions by the same multiplication factor (in this case 2), the resulting picture will be in proportion to the original.

So, does that mean I can't make an 8"x10" print and keep everything I saw through my viewfinder in the final print without distortion?

Yes it does.


Here is an 8x10 print size (black lines) with the width of the original image set at 10 inches in Photoshop.

The picture above is the same image file enlarged to produce a print that is 10 inches wide. Notice that this sizing produces a picture with a large white border at the top and bottom of the print. But the picture is proportionally correct and will NOT be distorted.

This same image can be enlarged to include everything in the original photo, but distortion will be visible and distracting. (The image will look funny.)


To produce a print that captures all the elements of the orginal file this picture must be scaled in only one direction. As a result, the picture will always appear distorted.


The vertical lines are elongated and distorted to create this full 8x10 print from the full frame of a DSLR camera.

The picture above has been "scaled" (stretched) to fill the entire 8"x10" piece of paper. Simply put, the DSLR full image frame can only be enlarged in a 2:3 ratio and contain the entire original image. Said in another way, both the height and width must be multiplied by the same number to remain exactly proportional.

Can that be true? I see professional photographers selling 8x10 prints all the time.

You're right. But the professional photographer understands this "fact of nature" and crops for the 8"x10" print while he/she is taking the picture.


Photographers understand the area of an image that will be included in an 8x0 print (the red box) when they are taking the picture.

The red box superimposed on the picture above is burned into the mind of long-time photographers. They understand that the original picture must be taken with the final print size in mind. In this case, if the end result is to be an 8"x10", the photographer will keep his entire printable image within the boundaries of the red box. That portion of the image will enlarge to a perfect 8"x10" and the remaining image at each end will be discarded.

By the way, the 8x10 proportion is also applicable to other standard photographic print sizes -- 4"x5", 16"x20" and 20"x24".

Some professional cameras will have this (and other) proportion indicators physically etched into the viewfinder's ground glass to provide an exact visual reference for the photographer.

From a practical and beginner's standpoint, when in doubt leave a little extra room around your image as you take the picture to allow you to eventually make a print that contains all the elements you intended in the picture.

Below are two versions of another picture to illustrate correct and incorrect proportions in a digital image. The distortion caused by scaling (stretching) an image to fill an area that is not proportional to the original is easiest to visualize in "people" pictures:


This picture is shown in the native 2:3 proportion of the original DSLR image.


The same image when forced to fit into the 4:5 ratio of an 8"x10" print via Photoshop's "Scale" function.

Obviously the contorted effect caused by the disproportionate scaling is objectionable and not a true rendering of the subjects. At the same time, notice that every picture element in the original 2:3 ratio photo is contained in this version as well. But each element has been elongated to fit the format while grossly distorting the image.

Finally, there is one more alternative. The actual dimensions of the picture area of the third picture in this post are approximately 10 inches by 6.7 inches. Remember this picture is proportional to the original image file. There is nothing wrong with a 10"x6.7" picture. It just won't fit in a normal frame (like 8"x10") or pre-cut matt. But that's not necessarily bad. You can cut a 10"x6.7" matt or have a framing store cut one for you. For example, a framing company could cut a matt with the outside dimensions of 11"x14" and a cut out measuring 10"x6.7". The resulting matted print would then fit inside a standard 11"x14" frame.

If you have questions or comments, just let me know.

Friday, October 24, 2008

A Primer on Built-In DSLR Flash

I was amazed at how detailed the twinkling stars appeared as I was watched the first game of the 2008 World Series on an HDTV. Then I realized the game was taking place in the Tampa Bay Devil's enclosed Tropicana Stadium. Those weren't stars. They were thousands of individual electronic flashes capturing the first pitch of the game.

At that same instant, my mind flashed back to the first days of my photographic career when I managed a color lab and processed literally millions of similar pictures for amateur photographers. The events and pictures varied from Friday night high school football games from the top bleacher to parents recording their child's graduation from seat ZZ10, but the results were always the same -- great pictures of the backs of peoples' heads seated 3 to 4 rows in front of the photographer and no image of the event taking place 300 to 400 feet away.

The moral of the story is -- like Dirty Harry would say -- "a man (or woman) has to know his limitations." Limitations is the story of your camera's built-in, electronic flash. The camera's built-in flash is extremely convenient and useful within its effective range.


When taking a flash picture, the light rapidly spreads out to illuminate the subject (above). A portion of the light strikes the subject and is reflected back to the camera's lens. Because of the spreading of the light and the distance that light is required to travel (to and from the subject), much less light returns to the camera than was originally emitted by the flash unit. It's the returning light that determines the aperture setting needed for a correct exposure.

The illuminating power of a photographic flash unit is normally expressed as a guide number. A typical guide number for a flash built into today's DSLR is 40 feet at an ISO of 100. Photographers have used this guide number for years to determine the correct aperture setting (temporarily forget about the automatic flash function on your camera).

The math is simple. Divide the guide number by the distance from the flash to the subject. The result is the aperture setting. For example, a flash with a guide number of 40 and a distance to subject of 5 feet would require an aperture setting of f/8. (40 divided by 5 equals 8)

Back to the automation in your camera. DSLR cameras with an automatic built-in flash are capable of electronically determining the distance to subject and performing the math to set in the proper aperture setting.

So why did I drag you through this explanation and 4th grade math?

Knowing the guide number of your flash unit and this simple equation speaks volumes about what pictures you can and cannot take. If the subject in the example above had been 10 feet away from the camera, the required aperture setting would be f/4. (40 divided by 10 equals 4) This is probably very close to the maximum possible aperture setting of your camera. By the time the subject is 20 feet away from the camera, the required f/2 aperture setting isn't available on your camera. You have exceeded the effective range of the camera's built-in flash.


As shown in the illustration above, the typical effective range of the built-in flash units in today's DSLRs is from 10 feet to 20 feet. As you exceed the maximum effective range of the camera's flash, the subject will become increasingly underexposed (darker) until it is completely lost.

Remember using a telephoto lens does NOT help this situation. The effective range of flash illumination is always determined by the distance of the flash unit to the subject -- regardless of the lens being used.

Estimating the average distance from the bleacher seats to the pitcher's mound at Tropicana Stadium to be 300 feet to 500 feet or more, is it any wonder why these pictures never turn out as expected?

Even most professional external electronic flash units can't take this picture. A typical pro unit might have a guide number of 150. Doing the guide number math with this guide number yields a maximum flash-to-subject distance of 50 feet to 60 feet. (Probably explains why professional sports photographers are seldom found taking pictures of night games from the bleacher seats.)

But someone will say, "Hey, I took a similar picture, and it didn't look too bad." Truth be told, in these instances, the flash played NO visible role in the exposure. What produced the image was the available light provided by the stadium's lighting -- not the flash unit. Certainly the photographer saw the flash fire, but not enough light returned from the subject to make any visible exposure. It was the stadium light that made the picture possible.

If you find yourself in one of these seemingly impossible situations, try turning off the flash and use the light that's available in the arena. It may be necessary to increase the ISO setting to 800 or higher, but it's better than losing the picture opportunity.

Note: Guide numbers are directly related to the ISO setting of the camera. The higher the ISO setting the greater the effective distance of the flash unit becomes. This alternative provides a small gain in effective distance, but the trade off will be pictures that show more and more visual noise (grainy appearance) at each higher ISO setting.

One final cautionary note: Light emitted by the built-in flash unit "spreads out" at all angles when fired. One of these directions is downward.


Flash shadow created by a wide angle lens

This becomes important when using wide angle lenses. The flash picture above was taken with a lens that was too wide for the camera's flash. The result is the shadow seen on the lower half of the wall. The dark area is actually the shadow created as the light was interrupted by the top of the lens. Your camera's manual will indicate the maximum wide angle lens to be used with the camera's flash unit.

I will end this article with two other examples from my days managing a color lab for amateur photographers and processing thousands of pictures everyday. The first occurred when I covered the premier showing of the Star Trek movie for a local newspaper. After two decades of absence from TV, this movie was long anticipated. Sitting in the darkened theater, I couldn't believe my eyes when Captain Kirk first appeared on the screen and dozens of flash pictures were taken. You can't light up light. I saw those pictures pass through the lab the next day. What did these photographers get in return? Pictures of a completely white screen.

The second example occurred every day with a stream of flash pictures people would take of their TV screens. What did they get? Nothing but pictures of a bright flash reflected from the glass of the TV screen.

Know the limitations of the flash.

Thursday, October 9, 2008

Shooting Tip - Black and White DSLR Photography


Shoot in color. Convert to black and white in the computer.


Thought I'd get right to the point. Once again, the beauty and simplicity of the black and white image is making its "every 20 years" resurgence. I, for one, am delighted to see this revival. There's something delicate and emotionally compelling about a good black and white photograph that color cannot always convey.

This difficulty in shooting with a black and white image in mind is learning to "turn your color vision off". Learning to see the subtle changes in grays and the important role light plays in each picture is challenging. Taking up the challenge will not only lead to a new skill and admiration for the black and white photo, but it will also improve your color photography.

When black and white was the only choice for photographers, the ability to "think in black and white" was quickly learned. Today, that learning process can take place in front of your eyes on the computer's monitor. When starting down the black and white road, spend time looking at your existing library of color images and convert them back and forth between color and black and white to observe the differences. What happens to trees, rocks, wood, sky, people, details, shadows, highlights, etc. when the color is eliminated? This exercise will begin to train your eye and mind to make the same conversion when you're shooting in the real world.

Now... go to the library. Yes, I said the library -- not the Internet. Look up the works of some of the masters of black and white photography. Ansel Adams is a good place to start. Study these images to gain an insight into how the masters interpreted their world in terms of black and white. I recommend the actual library book because the images in these books were usually printed under the guidance of the photographer. The images in these books reflect how the photographer wanted you to experience his vision. Much of the subtlety and impact can be lost when viewing the same images on your monitor from an Internet photo collection.

So, here's a color image that I took with the intention of producing a black and white photograph. I followed all the rules of exposure (see Hub's Camera primer for "Exposure Is Everything", Parts 1a and 1b) to produce an acceptable and printable color image.


Old Grist Mill, Clark County, Washington

In my image editing program, Photoshop CS3, I used the black and white conversion option under the "Image/Adjustments" menu. In the case of Photoshop CS3, the conversion of color to black and white has been enhanced to allow individual color intensities in the original image to be altered during the change from color to black and white. For example, I could lighten the trees in this picture by adjusting the green channel. Not all image editing programs have this enhanced capability, but all should have an option to convert your color image to black and white. That's OK. Here's my converted image:


Old Grist Mill, converted to B&W in Photoshop

This is what I "saw" with my black and white vision when I was on location. You'll often hear experienced photographers call this "pre-visualizing the image." They have the ability of seeing the color, tones and details of this image in their minds in shades of black and white. That's a very good thing. But take heart, it's a learned skill that you can master. Practice, practice, practice.

As you train your eye, you will learn to pre-visualize the final picture in many forms. Here's a variant of the same image toned to mimic old-style antique toning processes:


Old Grist Mill, toned in Photoshop CS3

In this version of the original photograph, the scene is reproduced in shades of black and brown to render a different look and feel to the image. The possibilities are nearly endless. The trick is learning to see them as you are taking the picture.

I started this discussion by saying "shoot in color and convert to black and white in the computer." Some DSLR cameras have a black and white option in their menus. If you select this option, no color will be recorded -- just shades of gray.

However, you never know when you might want this picture in color for some other purpose. So shoot the picture in color and then convert the image in your computer and SAVE it under another name. This way you'll always have the original color photograph to use later.

If you have questions or comments, please let me know.

Sunday, October 5, 2008

Hub's Visionary Photographers Blog Launches Today


Today is the official announcement and opening of
Hub's Visionary Photographers blog.

The articles presented in this blog are contributed by today's leading photographers, photo educators and photographic authors. (That's right. You won't be subjected to my writings.) Here you will find the wisdom, words and images of those photographic luminaries who are defining the art of photography in a digital world and leading us to new levels of visual expression. Each Visionary has a sincere and burning desire to help the next generation of creative photographers.

As with all my photography blogs, it's FREE. Just lots of great information, insight and inspiration for anyone serious about photography and who wants to learn more about today's photographic heros.

So, check it out and sign up for a feed or immediate email notification of new articles.

Monday, September 22, 2008

Compact Flash Cards - Digital Film

Compact Flash (CF) cards are the predominant in-camera, storage media for the majority of modern DSLR cameras. This post looks at Compact Flash cards and the jargon you will encounter when making a purchase decision.


The original compact flash by IBM (left) and a current CF card sold by Calumet Photo

Compact flash card are miniature hard drives that have been optimized for use in today's high performance DSLRs. Currently CF cards are readily available with storage capacities from 1 megabyte to 64 gigabytes. (Because of the ever decreasing cost of these cards, CF cards lower than 1 gigabyte are more difficult to find and rapidly disappearing.)


Type II CF card (left) and Type I CF card (right)

CF cards come in two flavors: Type I and Type II. The difference is thickness. Type II cards are thicker than Type I. (5mm vs. 3.3mm respectively). Your camera manual will tell you if you are limited to Type I or Type II.

The original IBM compact flash card has a place in history because every subsequent advancement uses the writing speed of the original as its speed measurement base. (This is the same tactic taken by CD manufacturers when citing writing speed -- comparing the newest CD to the original Compact Disks.)

The speed of the original IBM CF Type II was 150,000 bytes per second. Today CF cards can be purchased with 305X write speeds. That's 305 times the original 150,000 bytes per second or 45 megabytes per second.

It's obvious that as the megapixel count on DSLR image sensors increase, the files stored on CF cards are becoming larger and larger. So higher storage capacity certainly makes sense -- unless you like changing CF cards or downloading images every few shots.

But what about the increases in write speed? Why is this important? Well, write speed of a CF card ultimately determines how quickly a modern DSLR can release an image from its internal memory. And this is very important when shooting in "continuous" mode (sometimes referred to as sports shooting mode). The number of images your camera can take in rapid succession is in large part determined by how fast the previous file(s) can be written to the CF card and eliminated from the camera's memory. With some high-end DSLR cameras having the capability of taking 10+ images per SECOND, the bottleneck to continuous shooting becomes the speed the CF card is able to accept and write image data.

For most mid-range DSLRs currently on the market, a speed rating of 133x and up should keep up with the data throughput demands of the camera in continuous shooting mode. Of course, this will change tomorrow as faster cameras are introduced.

Beware of CF card prices that seem too good to be true. They probably are. Double check the specifications of these bargain cards to ensure that they meet the parameters of this discussion. If you aren't provided specs, don't buy the card.

If you have questions or comments, please let me know.

Never Stop Learning


Photography student at the Santa Fe Workshop

One of the most frequently asked questions I encounter from "freshman" photographers around the country is, "Where and how can I learn more about photography?" Two qualifiers are often attached to this question:
  • "that doesn't require me to have years of shooting and technical experience"
  • "that doesn't cost too much".
Obviously, the Internet offers some of these learning opportunities. Even sites that are primarily driven by a more technically oriented membership have sections devoted to beginning photographers. One such site is dpreview.com. Among the many forums hosted by DPREVIEW is an area devoted to "Beginner's Questions". What's most appealing about this forum is the willingness of the most experienced photographers to share their knowledge. Having followed this forum for many years, I have observed that there has been no question left ignored, unanswered or considered too basic. In fact, if you post a question on this forum you are likely to receive dozens of comments/replies within the first few hours.

As much as I admire these Internet educational sites and the service they perform, they (including this blog) are no substitute for hands-on guidance in photography. So I would like to offer some suggestions that provide the beginning photographer with live and in-person opportunities for a more personal photographic learning experience.

Camera Clubs

Virtually every community has at least one camera club. Camera club meetings can occur once or twice each month and the membership usually includes all levels of photographic experience -- beginner to professional. Membership fees are nominal, but well worth the investment. Since these organizations were established to foster and nurture photography, they are designed to cater to the needs of the new photographer. Most importantly everyone at a club meeting shares your love of photography and insatiable appetite to learn more.

A large portion of these local camera clubs belong to regional organizations called Councils. These Councils coordinate group activities, newsletters, educational seminars and photo competitions that individual camera clubs alone could not afford to develop or manage. If you enter, "camera club councils" into Google, you will likely find a Council that covers your location. The council websites contain a list of member clubs in your area as well as the contact information. Here's one such Council that I have grown to admire over the years for the activities and information they provide their member clubs -- The New England Camera Club Council. The NECCC covers the northeast U.S. and conducts one of the largest and most anticipated yearly conventions and educational events in the country. Take a look at the NECCC to get a flavor for what a camera club membership can mean for you.

You might also consider joining the Photographic Society of America. PSA is the mother organization for camera club Councils. PSA has an entire program specifically focused on the new member/new photographer. Their website is a collection of the best ideas and educational opportunities available. Member galleries afford you the opportunity to explore the work of other serious amateurs and learn from their experiences.

Local Community Colleges

The most frequently overlooked educational opportunity is in everyone's backyard -- your local community colleges. These institutions routinely offer credit and non-credit classes that range from basic to advanced photography subject matter. In many cases, the teachers are area working photographers who know your location and are a part of your community. These classes not only bring together photographers of similar skill levels, but people who are your neighbors. Fellow students can become lifelong friends and an "ever present" local resource of photographic knowledge. Community colleges may be the home of "user-friendly education" because students attending these adult education classes all share a similar passion and skill level ... and are all seeking the same answers.

I recently ran a Google search on "community college, photography" and received 2.26 million hits. Statistically speaking there's a high probability that you have a community college option in your area. The cost of a 6 to 10 week basic photography course is usually in the same range as membership in a camera club.

Specialized Photographic Workshops and Seminars

Several well respected private photographic workshops are available around the country. Nearly every one of these workshops is situated in a picturesque location. Again the range of student photographic expertise varies. These workshops make a business of developing and offering sessions that are geared to all levels of experience.


Students at the Santa Fe Workshop reviewing a famous photographer's portfolio

These workshops also represent the most expensive learning option. That said, it's money well spent. I have always considered workshops to be exciting photographic vacations. Viewed as a major vacation event, workshops are no more expensive than any other week-long vacation you might be contemplating. More importantly, the educators at these sessions are among the most respected photographers of our time. Spending a week with one of these photographic luminaries and fellow photographers in a small, focused class environment is a once-in-a-lifetime experience that is well worth saving your money to attend.


Two such organizations that I have personally experienced and admire are:
  • The Santa Fe Workshop - Located in Santa Fe, New Mexico. The director of the Santa Fe Workshop works tirelessly to ensure each year's selection of classes contains a who's who of respected photographic instructors, and that each session is packed with hands-on learning and personal critiquing opportunities. A complete digital darkroom is available as well as exposure to the latest photographic equipment. Sessions are conducted throughout the year. Attending a Santa Fe Workshop week-long session should be on your "Bucket List".
  • The Nikonians - Providing seminars and shooting events throughout the U.S. and Europe. The Nikonians is an independent organization for Nikon DSLR owners of ALL skill levels. Most Nikonian seminars are one or two day events that take place across the country. In addition, the Nikonians offer frequent guided photographic expeditions to some of the most photographic areas of the U.S.

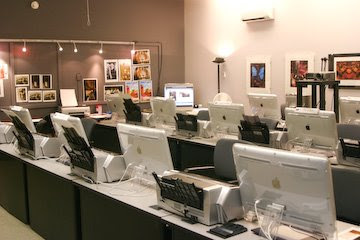
Santa Fe Workshop's fully equipped digital darkroom provides students the experience of using and learning on the latest in imaging technology.


Nikonian founders on location during a recent expedition to the Grand Tetons

Many professional photographers supplement their income by conducting seminars around the country. Googling "photo seminars" reveals a long list of area events by these photographers. Private seminars usually cost a little more and are generally designed to cover a specific aspect of photography (for example, landscape photography, portrait photography, digital printing, workflow, etc.)

Most successful, customer-focused camera shops understand the PR and financial advantages that photo classes provide their businesses. So check your area camera shop for a list of upcoming classes. Most of these seminars are short (one day or less) and range from free to a very small admission charge -- a real bargain.

Photo Art Galleries/Exhibits


Exhibits of the works of today's master photographers (like this Douglas Kirkland exhibit) travel to special events and galleries all over the country.

Nearly every community features photographic exhibits throughout the year. Venues include established art galleries to county fairs and from libraries to camera shops. Spotlighted photographers can be local, national or international. Take every opportunity to visit photographic exhibits. Learn from the work of others. You'll likely find a style and subject matter that's in tune with your personal taste. Learning from the works of others is certainly the highest form of flattery and provides beginning direction to your own photography.

Photo-Centric Conventions/Trade Shows


Trade shows are prime locations for seeing the latest photo technologies and learning from the manufacturers' experts.

If you want to be overwhelmed with the latest information and technology, attend a photo-specific convention that includes manufacturer booths/exhibits. Naturally, the manufacturers' goal for participating in these trade shows is to SELL. However, you are guaranteed to find the best photographic experts from each company at these shows. They are especially sensitive to the beginning photographer and accustomed to answering the most basic to the most technical questions. And, best of all, you get to play with the newest equipment and technology. It's definitely an educational and "wish list" opportunity.

High on the list of "must attend" trade shows for photographers is Photo Plus Expo held at the Javits Center in New York City each October. PPE brings virtually every photo manufacturer together to display their wares. You'll find some of the most prestigious photographers on the planet conducting on-site seminars and exhibiting their art. New York is, without a doubt, the center of the photographic world, so expect to be one of about 60,000 attendees while enjoying a fantastic photography adventure.


Renowned photographer Albert Watson inspires a standing room only crowd of over 300 admiring photographers at the 2007 Photo Plus Expo in NYC

Similar, but smaller, trade shows/conventions are conducted year-round throughout the U.S. Attending one trade show each year will keep you abreast of advancements in our craft and expose you to many exceptional on-site, sponsored seminars tailored to your interests. Some of these events include:
  • North American Nature Photography Association (NANPA)
  • MacWorld
  • Photo manufacturer's association (PMA)
  • Wedding and Portrait Photographers International (WPPI)
  • Imaging USA (the Professional Photographers of America annual gathering and trade show)

Do-It-Yourself

I include this classification to remind every beginning DSLR user that real learning takes place every time you pick up your camera. I learn something nearly every time I shoot a picture. It's these personal occasions that allow me to experiment with the lessons I have learned from any of the above events. There's no better teacher than experience. The more you shoot, the more you learn. Take notes when you shoot, and download/review every picture.

So the answer to the question is: There's a world of hands-on photographic learning opportunities for the beginning photographer. And, there is always something happening near you.

I hope you are able to experience a few of these educational events. It's all part of the fun of your new-found art form.

If you have questions or comments, feel free to contact me.

Tuesday, September 9, 2008

The Cheap Photo Studio

Putting aside the possibility of exposing how basically cheap I can be, this post discusses one way you can construct a table top studio in your own home. The idea for this post came from my recent experiences as a blog writer.

I knew from the onset that, to be truly useful to the beginning photographer, the information I supplied on this site demanded photos that clearly illustrated the material being presented. I also knew that in most cases, the photos would be of small, camera size objects. Ideally the studio set up would be close to my computer, so I could quickly snap an image, import the file into my computer and marry it with my blog content.

I have large studio access some distance from my computer, but the answer for me was to create a small table top studio that was within arm's length of my digital darkroom. As I looked at the commercial options, it seemed that most appropriate table top studio kits cost $100 or more. Since my blogs are without financial support and I don't sell anything, spending $100+ seemed excessive.

I decided to explore a home-brewed alternative and construct my own mini-studio. Here's how it came together.

My first concern was lighting. I wanted relatively soft lighting that approached the color temperature of daylight to reduce my white balance concerns. Spending time at my local Home Depot lighting department, I found one of those new fangled fluorescent replacement bulbs in 100 watt equivalent that was balanced for daylight:


My Home Depot 23 watt daylight fluorescent bulb produces the equivalent light level
as a 100 watt conventional bulb. Cost: $4.50 each.


Since the physical area of this table top set up is only about 6 square feet, three 100 watt equivalent bulbs provide ample light for exposures made with a tripod-mounted camera. (My average exposure has been 1/60th of a second at f/8. Fast enough and plenty of depth of field.)

Next I toured the automotive department where I found a budget bin containing "clamp on" utility lights with a silver reflective surface. I bought three of these light fixtures for $3.98 each.


The Home Depot clamp on utility light with daylight fluorescent bulb installed.
Each fixture plus bulb combination cost $8.48.


The accidental advantages of this lamp-fixture combination are cooler operating temperature, lower electrical consumption and longer bulb life. Works for me.

To create a seamless background, I used a 30 inch x 40 inch photo mounting board that I had on hand. Mounting board not only provides the seamless background effect I wanted, but allows me to quickly change background colors as the picture requires. Fixing the mounting board in place was a breeze when I realized the carpenter clamps in my garage would snap in place on the edges of my photo table to securely hold the board without marring the board or table surfaces.


You guessed it. I originally bought my carpenter clamps from Home Depot as well.

I have light stands, but only one resides in my computer darkroom. So, I used furniture at hand to provide additional supports. You won't believe what I eventually found most useful for this purpose.


Table top studio in action.

Here's the final product. By clamping the mounting board to my table top edge and curving the board to lay against the back wall, I created a working table top studio that I could quickly change to accommodate any small object. By the way, that light stand holding the high key light on the left is a wire-framed bar stool.

My out of pocket cost for this Home Depot Studio was $25.44 plus some odds and ends I had in my workshop. I use scrap white mounting board pieces when I need to add some reflected bounce light. Because I'm using solid colored mounting boards in a seamless arrangement, retouching and masking in Photoshop is a snap. (Usually the magic wand tool in Photoshop is good enough to completely mask out the background.)

Note: Because these are fluorescent bulbs, allow a couple of minutes for the bulbs to warm up to their full intensity. Also make sure you purchase the daylight balanced version.

It's true that we are slaves to an expensive hobby. However, there are ways of minimizing the cost without negatively impacting the quality of our photography.

If you have similar do-it-yourself cost savings tips for your fellow photographers, I'd love to hear about them. I'm sure someone out there is getting creative with duct tape. If you have any questions or comments, you know where to find me.

Tuesday, September 2, 2008

Equipment Tip - Shutter Release & Image Sharpness

A few posts ago, I touted the advantages of using a tripod whenever possible to increase the sharpness of your images. I briefly commented on using a shutter release cable to add to camera stability. Consider triggering the shutter even when the camera is mounted on a tripod. Even with the support offered by the tripod, camera shake can still occur -- especially with lower quality, inexpensive tripods. Here are three ways the shutter can be released when the camera is mounted on a tripod:
  1. Push the shutter button with your finger. Advantages: You never forget to take your trigger finger with you, and it doesn't cost anything. Cons: The action of pushing the button can shake or move the camera to impact the quality and sharpness of your picture.
  2. Use the camera's self-timer feature. (And you thought it was just for taking pictures of yourself.) Advantages: Again the feature is always there, and it came free with the camera. Cons: Takes some time to set up, and when you physically push the button to activate the self-timer the camera might move slightly.
  3. Use a wired or wireless shutter release. Advantages: Since the device is a switch that actuates your electronic shutter, it provides a truly motionless shutter button release and the sharpest alternative. Cons: The cost of purchasing the accessory.

The cost was prohibitive enough that it wasn't until recently that I made the investment. (Up to this time I had been using the camera's self-timer exclusively.) The shutter release cables made by my camera manufacturer were expensive and were never on sale.

Then I saw an ad on Pro Camera Gear's website for a wired and wireless remote made by a company called Micnova. The wired model was selling for $12.99 and the wireless remote version was priced at $29.95. That's over 60% less than I had thought I was going to spend. Being a wild and crazy guy (as well as never knowing when I might need the wireless feature to safely capture Sasquatch in the mountains of Washington), I purchased the wireless remote.


The Micnova wireless remote consists of two units:
1) the receiver and 2) the transmitter.

The wireless remote came with batteries and just needed to be attached to the front connector of my Nikon D200. Bingo. Ready to take pictures.

The unit can be user set to any of 16 channels to avoid interference with the other Sports Illustrated photographers at the Super Bowl game. The button on the transmitter works just like the button on my camera's body. Push the button part way down to activate the meter and auto-focus, and then press the button the rest of the way down to trigger the shutter.

So, here's a way of getting the advantages of a shutter release cable when taking tripod mounted pictures without spending too much money. Best of all, you don't have to worry about accidentally leaving a finger at home. In actual shooting conditions, I've been as far away as 30 feet from the camera, and the shutter has functioned without a hiccup. Both the wired and remote versions are available for most popular DSLRs.

Hope this is helpful. If you have comments or questions, you know where to find me.

Monday, September 1, 2008

Shooting Tip - Density Range


In true blogging spirit, I want to pass along a comment I recently heard at a photo seminar I was working. It was one of those "Why didn't I say that?" moments.

The speaker was Stephen Johnson. If you don't know Stephen's work, check out his website. Stephen is a respected landscape photographer, author and instructor. You'll be amazed at his images of our national parks.

I was able to sneak into Stephen's presentation while he was discussing proper exposure. At one point, he commented that "there's no rule saying that an image has to include the entire density range". Meaning a good photograph doesn't automatically mean it contains densities from pure white to pure black. Neither reality nor a photographer's vision is constrained to taking pictures that contain a full range of densities.

Although I've never been guided by the belief that every picture must contain pure whites and pure blacks, I have never said it to my students. I revisited many of my pictures to find a couple that would illustrate Stephen's point.


Neither of these pictures contains pure whites nor pure blacks. This shallow range of densities only adds to the emotional feel of the images. (Again, check out Stephen's website and see how he approaches density range in his own work.)

So the tip is: Don't be misled into thinking your pictures MUST contain the full range of densities from pure white to pure black. Pictures need a density range that's appropriate for the mood, subject and conditions -- and no more.

My thanks to Stephen for reminding me that what I take for granted isn't necessarily understood by others.

I hope this is helpful to you as it was for me. If you have any questions or comments, you know where to find me.

Friday, August 29, 2008

Photo Equipment Tip - Polarizing Filter


You will find a few essential photographic filters in a professional's camera bag. Filters are used on the camera's lens for several reasons including:
  • To reduce UV light entering the camera to minimize atmospheric haze (UV and Skylight filters)
  • To intentionally reduce the amount of light entering the camera (neutral density filters)
  • To alter the color appearance (warming, cooling, fluorescent, etc. filters)
  • To create special effects (twinkle filter, soft focus filter, vignette filter, on and on and on)
  • To reduce glare and the effect of polarized light in an image (polarizing filter)
  • For lens protection (to protect the expensive front glass element and coatings of your lens)
Of these filters, the ones I recommend as "must haves" are UV (primarily as lens protection) and Polarizing filters. This post discusses the dramatic impact a polarizing filter can have on your photography with very little effort.

My metal cow picture helps illustrate the effect of a polarizing filter.

Metal cow shot without a polarizing filter

This image contains two photographic elements that polarizing filters are designed to enhance. Glare from a highly reflective surface (the cow) and the glare in the sky provided by the naturally occurring water droplets in the atmosphere. Both are shiny surfaces producing light reflections that are all traveling at the same wave length. We perceive this phenomenon as glare.

The picture below was taken using a polarizing filter:

Metal cow using polarizing filter
(no computer enhancement was applied to this image)

In this picture, the polarizing filter has dramatically reduced the naturally occurring glare in the atmosphere to reveal the deep blue sky with contrasting white clouds. In both pictures, the sky was blue and the clouds were white, but by using the polarizing filter in the second picture, the blue was enhanced and the clouds were made to stand out in stark contrast. (The clouds remained very white because the light coming from the clouds was not all at the same wavelength, and consequently nearly unaffected by the filter.)

A similar benefit is immediately achieved when you are taking pictures of water surfaces. This filter reduces the surface glare to reveal details below the surface. (Unless you're photographing the Hudson River.)

Using a polarizing filter is easy because the effect is seen through your viewfinder. No guessing. No special calculations. A circular photographic polarizing filter for your camera screws into the front threads on your lens. Unlike other filters, after the polarizing filter is installed it can be freely rotated to create the desired effect. In one position the filter has little or no effect, while turning the filter 90 degrees provides the maximum effect (rotating the filter aligns the filter 90 degrees to the wavelength of the glare light and causes the filter to absorb the glare's wave length).

Because the filter rotates, the effect is continuous. What I mean is that you can turn the filter to the position that visually enhances your image to the degree YOU think is best.

You see this effect in your daily life and may not have been aware of it. If you have a pair of polarizing sunglasses (which I highly recommend) and look at a blue sky, what happens to the sky color when you tip your head to the side? It becomes lighter because you're allowing more glare to pass through the sunglasses. The manufacturers of sunglasses make the assumption that you will be driving in a normal upright, sitting position. Consequently, they have aligned the polarizing filter for you in this sitting position. But when you lay on your side, the glare returns. (When my kids were little, I would use this trick to demonstrate their father's mastery of all things scientific. Of course, I was left without my sunglasses for the rest of the trip.)

Photographers aren't quite so lucky. Since filter manufacturers know that you might shoot a picture in virtually any position - literally, the filter must be allowed to rotate to the best glare reducing position. You make the rotation and alignment decisions based on what you see through the viewfinder.

In general the news is all good about a polarizing filter:
  • It reduces glare
  • It enhances the sky color and density in landscape shots
  • It increases overall color saturation slightly
  • It provides protection to your lens front glass element.
There are two downsides of note:
  • A polarizing filter is about the most expensive filter you can buy for your camera. I've seen a price range of $50 to $150 dollars. Ask any pro photographer and he/she is going to say, "It's worth the money."
  • A polarizing filter is dense. By this I mean the filter is a dark gray color (see picture at top of this post). You lose about 1.5 to 2 f/stops of light when you use a polarizing filter. This is not generally a problem (especially if you use a tripod -- like I preach). But be aware that your aperture and shutter speed will be wider and slower (respectively). This is a problem in lower light conditions. Fortunately, this filter is generally used in bright sunny conditions where there is ample light.
Many DSLR camera manufacturers offer polarizing filters for their family of lenses. Tiffen and Hoya are two filter manufacturers who also make a complete line of high quality photographic filters.

Digital Imaging Note: Some might say, "Well I could do this in Photoshop." If you are an experienced Photoshop user, that might be true. However, it would require some sophisticated masking and saturation/density adjustments to replicate this filter effect. I would counter by saying, "Why not just do it at the time the picture was taken. No digital image enhancement required. You see what you're getting immediately. And it's easy. And if you don't do your own digital computer enhancement, it's a no-brainer. Buy the filter.

I hope this helps you. You should be immediately rewarded with some exceptional outdoor/landscape shots. If you have any questions or comments, you know where to find me.