Saturday, August 23, 2008

Shooting Tip - Subject Sharp, Background Blurred

You've seen how a moving subject (the water example in my last post) can be intentionally blurred to emphasize and enhance the feeling of motion.

But there is another side of this motion blur coin. The picture of the softball runner below was taken on a bright sunny day using a shutter speed of 1/500th of a second. The motion of the runner was definitely frozen in mid-stride:


This is certainly a great documentary picture, but beyond capturing the moment the image lacks visual impact. Even more distracting is the sharp and cluttered background. The runner's right leg and foot are visually lost in the second baseman's leg, and the tennis court nets are distracting.

Now contrast the picture above with the more dramatic picture below:
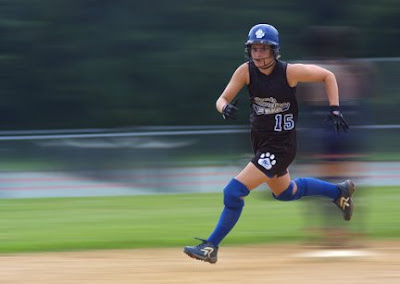
Notice the position of the runner. She is intentionally placed in the right half of the frame to provide adequate room for her to "run" visually through the picture. Giving your action subjects room to move through the picture provides a critical visual and psychological balance.

In this version, the subject's motion is frozen and sharp. However, the background shows motion blur to emphasize the speed of the runner and de-emphasize (blur) the distractions in the first picture. The visual effect is so compelling that the viewer's eye is actually drawn into the action and emotion of the moment.

So, how's it done?

Not too long ago there was only one way to accomplish this effect. It was all done in the camera when the picture was taken. Thanks to the new digital darkroom there are now two ways of creating this background blur. This post covers the traditional "in camera" technique.

The skill to be learned is panning. Panning the camera means taking a picture while your camera is physically moving in sync with the action of the subject. When you match the movement of the camera to the movement of the subject, it's now the background that's moving. So any motion blur "seen" and captured by your camera will be associated with the background -- not the subject. The illusion is that the subject isn't moving while the background is. It's the same effect you experience in a car when you look at the person seated next to you. The scenery outside the window appears to be in motion while your friend appears sharp and stationary. As you know, the reason for this illusion is the fact that you are traveling at the same speed as your friend. (No. I don't know why a fly inside a car does not smash into the windshield as he flies.)

Speaking photographically, since the subject is effectively "standing still" the shutter speed you select can be much slower than a typical action shot. Whatever shutter speed you feel confident hand holding that would produce a sharp picture on a totally stationary subject will work for this effect. In fact, the slower the shutter speed the more motion blur will be noticeable in the background.

For example, if you know you are steady enough to shoot a picture of a stationary subject (like a tree) at 1/60th of a second while hand holding the camera and produce a sharp image with no camera shake, then try this technique starting with 1/60th of a second. Then try one at 1/125th of a second and check the results on your camera's preview screen or computer monitor.

IMPORTANT TIP: As you pan with the subject and after pressing the shutter button CONTINUE PANNING. The picture must be taken DURING the pan -- not at the END of the pan. This smoooooth shooting technique will ensure the blur's timing is correct and continuous.

Since you MUST control the shutter speed and not allow the auto exposure feature of your camera to change the selection, either Shutter Priority or Manual shooting mode is used.

So how do I focus on a moving subject? Good question. Because my location is fixed during the taking of these images, I have time to pre-set my focus. In the case of the softball runner, I was located along the first base line and was able to pre-focus my lens in MANUAL focus mode to the location shown in the picture. As a result, I only had to concentrate on the subject and take the picture as she entered my focus zone.

Another option is to use the CONTINUOUS Auto Focus mode provided on some cameras. In this case, the camera's auto focus system will "track" the subject and attempt to maintain focus as you are "panning" your subject. Either technique can be used, but I prefer pre-focusing to the point I anticipate taking the picture -- whenever I have the luxury of knowing the line of travel my subject will be taking.

Now you're ready for the next NASCAR race.

In my next post, I will discuss creating the same effect using the computer.

Any questions or comments? Let me know.

Shooting Tip - Motion in Flowing Water

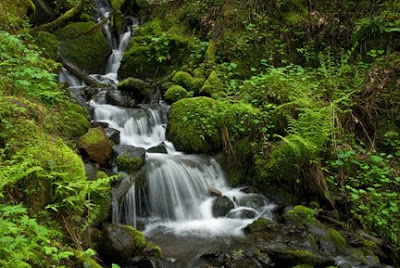
One way of creating a feeling of motion is to allow the moving part of the image to intentionally blur. Our minds translate this blur as motion when it's associated with a subject that is normally seen in motion. The classic example of this technique is flowing water. The picture below creates a sense of motion and is almost ethereal in appearance:


The technique isn't difficult, but demands the use of a tripod and patience. For those just beginning in photography, the mere exercise of using this technique is a great learning experience and the results are almost always rewarding.

The secret is NOT to use a shutter speed that will freeze the movement of the water. This means a slow shutter speed is intentionally used. It's this slow shutter speed that dictates the use of a tripod. The actual shutter speed is determined by two factors:
  1. The speed of the flowing water. The slower the water is flowing, the slower the shutter speed must be set.
  2. The amount of detail you want to remain in the water flow. As the shutter speed decreases, less and less detail will be seen in the water.
For the pictures I normally take in this situation, these two considerations generally result in a shutter speed in the range of 1/15th of a second to 2 full seconds. My shooting process looks like this:
  1. Use the rules of exposure to determine my ideal exposure to provide the highlight and shadow detail required. (See Hub's Camera blog for an in-depth discussion on the rules of exposure.)
  2. Decide how much depth of field is required in the scene. This decision will provide the minimum f/stop required. (See Hub's Camera blog for an in-depth discussion on depth of field.)
  3. Decide how much blur I want in the final picture. This decision will provide the shutter speed I must use.
  4. Convert my ideal exposure to an actual shooting setting. In this stage, I'm ensuring that the depth of field required and the correct amount of blur will be captured in my image.
Using these steps, here's how I took the picture above:
  1. I determined (setting aside all depth of field and motion considerations for the moment) that the ideal exposure is 1/60th of a second at f/2.8. (The scene was in the woods and in deep shade.)
  2. Using my camera's depth of field preview button, I could visually see that I needed an f/stop of at least f/16. (I wanted everything in the picture to be in focus.)
  3. The water was flowing rapidly, and I wanted very little detail in the water flow and decided a shutter speed of 1/2 of a second was sufficient.
  4. When I converted my original "ideal" exposure of 1/60th of a second at f/2.8 to these parameters, my final settings were 1/2 second at f/16. (This shutter speed/f/stop conversion goes like this: 1/60th @ f/2.8 to 1/30th @ f/4 to 1/15th @ f/5.6 to 1/8th @ f/8 to 1/4 @ f/11 to 1/2 @ f/16.)
By manually entering a shutter speed of 1/2 second and an f/stop of f/16, I have controlled the exact amount of light striking the camera's sensor to make the correct exposure as well as providing adequate depth of field and the blur needed to provide motion to the water. (That's right. I set the shooting mode to "manual". In this way I maintained the required exposure and prevented the camera from selecting an "automatic" setting.)

It's obvious that hand-holding the camera with an exposure of one half of a second is NOT an option. So a tripod is essential. In this way, only the water will show motion while the rest of the picture will remain tack sharp.

As I've said before, good photography is work. This process takes time. But as you gain experience with this technique, your set up and shooting process will become faster. Also, the rather subjective decision as to which shutter speed produces the best motion effect will become second nature over time. Anytime you have a doubt about the effect a shutter speed will yield, shoot more pictures at different shutter speed settings. (Don't forget to adjust your f/stop each time you change your shutter speed.)

You've already taken the time to carefully take your first picture. As long as you are set up, take extra pictures at different shutter speeds and f/stop settings. When you return home, evaluate all of these different versions on your computer monitor. You'll soon discover your own preferences.

So, give it a try, and let me see some of your results. I would love to see your work.

As always, if you have any questions or comments, you know where to find me.

Thursday, August 21, 2008

Safety Tip - Buy A UV Filter, Save Your Lens

At some point you will encounter and consider various filters that can be screwed onto the front of your lens. Many of these filters are designed to achieve special effects or provide specific correction capabilities while giving you a new creative tool.

From a beginning photographer standpoint, there is one filter that you should consider a MUST every time you purchase a new lens. This filter is called a UV filter. It does perform a photographic function -- decreasing the amount and impact of UV light that enters your camera and reducing the haze effect common in landscape scenes. But these considerations are secondary due to the UV elimination built-in to modern DSLRs.

However, this relatively cheap filter performs an even more critical safety function. This nearly clear filter protects the investment you made in your lenses. It shields the front element of your lens from fingerprints, destructive elements in the atmosphere that can act on the sensitive coatings of your lenses, water/rain and any accumulation of dust and dirt.


A UV filter (shown above on right) will protect your lens and your investment.
Notice the 58mm notation on the barrel of the lens. This is the size filter this lens requires.

Filters come in a multitude of sizes and there will be one just right for your lens. The size of the filter required is usually engraved on the lens barrel. If the filter gets dirty, lens cleaner and tissue will bring it back to new.

Major camera manufacturers sell their own line of filters. In addition, Tiffen and Hoya are two popular makers of photographic filters. Spending extra to buy a higher quality UV filter will ensure that the glass and coatings on the glass will have minimal impact on overall image quality.

Tip: Always purchase and install a UV filter when you buy a new lens.

Enough said. I will provide more entries on filters and their specific photographic use. However this safety information deserves to be posted alone and first.

Wednesday, August 20, 2008

Equipment Tip - Two Tips for Even Sharper Pictures


Here are two quick tips for taking sharper pictures.


As discussed in a previous post, using a tripod instantly improves the sharpness of your pictures. But even more can be done.

Here are two ways to eliminate any camera shake when taking tripod pictures.

  1. Consider purchasing a remote shutter release. This small lightweight remote switch allows you to activate the shutter button and avoid camera shake. Even when your camera is mounted securely on a tripod, this remote cable release will ensure that, in the excitement of the moment, you don't accidentally jar the camera when you press the shutter button.


  2. An excellent alternative (and zero cost) is to begin using your camera's self-timer feature. (And you thought it was only for taking pictures of you with your family.) But it's also a priceless feature when you want to trigger your camera and avoid all camera shake (this technique only works when the camera is mounted on a tripod).

So, pull out your camera manual and read the self-timer section. You'll be glad you did.

Equipment Tip - Photographic Lenses

(This posting is intended to help beginning DSLR users make wise lens buying decisions. The more technical aspects and shooting characteristics of lenses can be found on my sister blog site: Hub's Camera at www.hubbardcamera.com.)

Probably the most often purchased piece of equipment for any DSLR owner (next to data storage cards) has to be lenses. They are also among the most expensive items you can buy for your photographic craft.

During the period of my career when I owned 3 camera shops, I was always intrigued by the lens choices my customers made. Eventually my interest in these decisions developed into a well practiced, educational, over-the-counter discussion which I made a point of having with anyone making their first interchangeable lens decision.

(For this post, I'm assuming the camera you bought included a "normal" lens in the 50mm to 58mm range. So, adjust this discussion to your own camera/lens combination.)

Well over three-quarters of my first time lens buyers would ask FIRST about telephoto or long zoom lenses. To this day, I find the preference for a telephoto lens as a first purchase interesting.

To my way of thinking and based on the photography challenges I faced as a professional, a telephoto or long zoom lens is not a high priority. Think about the types of photography you encounter. Birthdays, weddings, family gatherings, award ceremonies, baby's first steps with mom holding child's hand, etc.

In most cases, the event takes place in a confined space with lots of people in attendance. The challenge is to get all of the people or landscape into a single picture. Knowing that the majority of the pictures I will shoot fall into this category, I would FIRST buy a wide angle (fixed or zoom) lens. Granted there are those whose photographic specialty is taking individual people portraits or images of that deer on the ridge that's over a mile away where telephoto and long zoom lenses are a necessity. But they too have families and similar space confining events to cover.

To get our definitions straight:

  • A "normal" lens usually falls in the 50mm to 58mm focal length range. This lens "sees" about the same amount of a scene as your own eye -- excluding your peripheral vision.
  • A telephoto lens (usually lenses with a focal length longer than 58mm) makes objects appear closer, but "sees" less of the overall scene.
  • A wide angle lens (usually any lens with a focal length less than 50mm) makes objects appear farther away, but it "sees" MORE of the overall scene. FYI: a lens with a focal length of approximately 21mm "sees" about what your eyes see -- including your peripheral vision.
  • A zoom lens has the capability of varying its focal length over a broad range. Zoom lenses can be purchased that cover very wide angles to extremely telephoto. Each zoom lens will be denoted by the specific focal length range covered. (For example: one zoom -- a wide angle zoom -- might cover a range of 12mm to 24mm while another -- a telephoto zoom-- might have focal lengths of 100mm to 200mm.)

Not too many years ago, zoom lenses were the scourge of the professional photographic community. These lenses were notorious for their optical imperfections (aberrations). However, lens manufacturers, their tools and their techniques have come a long way to make modern zoom lenses a viable and often preferred choice for even the most discriminating photographer.

In fact, whether it's a fixed focal length lens or a zoom lens, you can rest safe in the knowledge that if you purchase a lens from a major manufacturer, you'll have a good chunk of glass that will take outstanding pictures.

So, my tip. I would start my lens collection with a wide angle zoom lens and make my next purchase a telephoto zoom lens.


Shown here is my Canon wide angle zoom lens (attached to camera) and my telephoto zoom lens. These are my photographic workhorses. I have a similar selection of lenses for my Nikon system. With these lenses I am assured of having the right focal length for 98% of my shooting situations.
With only these two lenses in my camera bag, my total focal length range is 17mm to 300mm.

There is one more reason I recommend this type of lens combination. Less stuff to carry around. Instead of having ten fixed focal length lenses in my camera bag, I only have two. This makes bag searching quicker and lots less weight to carry in the field.

I hope you find this tip helpful. Again, visit www.hubbardcamera.com for more "techie" (but still beginner's) overview of DSLR camera lenses.

As always let me know if you have questions, comments or suggestions.

Equipment Tip - The Tripod

Any list of photographic tips is nearly endless. In starting this series of tips, I've decided to begin with suggestions that would have the most immediate impact on the quality of your pictures or that would be helpful answering the question of "which piece of camera equipment should I purchase next?"

After the camera itself, I personally place the tripod as my second most important purchase.


My trusty Gitzo tripod


First time DSLR users might see a tripod as a boat anchor to their mobility. In reality, a tripod is the accessory that provides the most immediate impact on image quality and composition.

  • Tripods provide a rock stable platform for achieving the sharpest pictures possible
  • Tripods, by their very nature, force photographers to take their time when composing their pictures.
For these reasons, my tip is to make a quality tripod your second equipment purchase. Quality, in the case of a tripod, does equate to cost. Expect to spend $75 to $150+ on a good tripod.


Rock Stable Platform

Studies conducted on pictures taken with and without tripods have repeatedly shown that final prints are visibly sharper when the camera is mounted on a good tripod. This is true regardless of the shutter speed used. So, as logic would suggest, a picture taken at a slow shutter speed of say 1/15th of a second is sharper when the camera is mounted on a tripod. But surprisingly, the same is true when we compare two pictures taken at 1/1,000th of a second. That's why you see professional photographers taking those breathtaking landscape photos using a tripod -- even on a bright sunny day.

Good photography is work. And a tripod is a big step towards sharp images.


Taking Your Time

Working with a tripod takes time. It forces the photographer to consider the scene and his/her composition. Now you've moved from taking a snapshot to spending time to consider other important components of a good picture -- angle, lighting, elements within the picture, depth of field, etc. That's a very good thing when you're starting out in photography. Tripods force us to consider the artistic elements of the pictures we're taking.

Good photography is work. And tripods make us think about our craft.

Of course there are times when a tripod is not appropriate. Tripods don't ususally work well at sporting events. (However, you'd be surprised at the number of monopods used by the photographers at Sports Illustrated. Monopods are the little brothers of tripods - using only one leg to stabilize the camera and lens.) But whenever possible use a tripod.


What do I look for in a good tripod?

  • Stability. A good tripod doesn't shake or move when you depress the shutter release button. Skinny tripod legs generally mean lighter weight for mobility, but they can also mean less stability. The purpose of a tripod is to provide stability, so it shouldn't move when you press the shutter button.
  • Maximum height when extended. A good tripod will allow the camera to be elevated to normal eye level position.
  • Minimum height. This is not only a consideration for backpackers, but also to allow you to get up "close and personal" to a subject that is low to the ground.
  • Head/Camera Platform. Look for a tripod with a head that provides maximum swivel adjustments from side to side and up and down. The camera platform itself should allow you to quickly mount your camera and be big enough to cover the entire bottom plate of your camera.
  • Locks. The locking devices used to secure the legs and the camera head at various heights should be easy to manipulate and secure. They must hold the camera in position at any angle with no movement.
  • Weight. My tripod has been my partner for decades and is made with heavy metal legs. It is hefty and can be a pain to carry into the field. But many of today's modern tripods are made from composite and titanium materials that greatly reduce the weight without sacrificing stability. (They are also more expensive.)
The nice thing about selecting a tripod is that you can try out various models with your camera at your favorite camera store. No guesswork. Ultimately, the model you buy is a personal decision. But never compromise on STABILITY.

If you decide that a tripod is just too much to carry around, then don't forget my next option -- a monopod. Apply the considerations shown above when you evaluate a monopod. In the end, either a tripod or a monopod is a significant improvement to hand holding your camera.

Here are a few companies that make excellent tripods: Gitzo, Bogen/Manfrotto, SLIK, Benbo and Vanguard. Of course, there are many more, but these are tripods I have used.

The tripod is definitely one commodity where the adage of "you get what you pay for" applies.

Next up - tips for buying lenses for your camera.