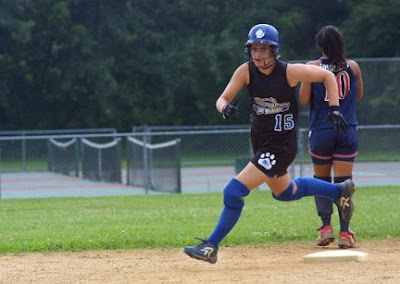
But there is another side of this motion blur coin. The picture of the softball runner below was taken on a bright sunny day using a shutter speed of 1/500th of a second. The motion of the runner was definitely frozen in mid-stride:

This is certainly a great documentary picture, but beyond capturing the moment the image lacks visual impact. Even more distracting is the sharp and cluttered background. The runner's right leg and foot are visually lost in the second baseman's leg, and the tennis court nets are distracting.
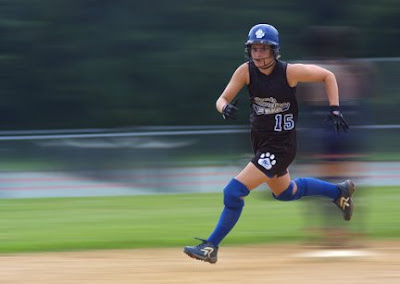
Now contrast the picture above with the more dramatic picture below:
 Notice the position of the runner. She is intentionally placed in the right half of the frame to provide adequate room for her to "run" visually through the picture. Giving your action subjects room to move through the picture provides a critical visual and psychological balance.
In this version, the subject's motion is frozen and sharp. However, the background shows motion blur to emphasize the speed of the runner and de-emphasize (blur) the distractions in the first picture. The visual effect is so compelling that the viewer's eye is actually drawn into the action and emotion of the moment.
So, how's it done?
Not too long ago there was only one way to accomplish this effect. It was all done in the camera when the picture was taken. Thanks to the new digital darkroom there are now two ways of creating this background blur. This post covers the traditional "in camera" technique.
The skill to be learned is panning. Panning the camera means taking a picture while your camera is physically moving in sync with the action of the subject. When you match the movement of the camera to the movement of the subject, it's now the background that's moving. So any motion blur "seen" and captured by your camera will be associated with the background -- not the subject. The illusion is that the subject isn't moving while the background is. It's the same effect you experience in a car when you look at the person seated next to you. The scenery outside the window appears to be in motion while your friend appears sharp and stationary. As you know, the reason for this illusion is the fact that you are traveling at the same speed as your friend. (No. I don't know why a fly inside a car does not smash into the windshield as he flies.)
Speaking photographically, since the subject is effectively "standing still" the shutter speed you select can be much slower than a typical action shot. Whatever shutter speed you feel confident hand holding that would produce a sharp picture on a totally stationary subject will work for this effect. In fact, the slower the shutter speed the more motion blur will be noticeable in the background.
For example, if you know you are steady enough to shoot a picture of a stationary subject (like a tree) at 1/60th of a second while hand holding the camera and produce a sharp image with no camera shake, then try this technique starting with 1/60th of a second. Then try one at 1/125th of a second and check the results on your camera's preview screen or computer monitor.
IMPORTANT TIP: As you pan with the subject and after pressing the shutter button CONTINUE PANNING. The picture must be taken DURING the pan -- not at the END of the pan. This smoooooth shooting technique will ensure the blur's timing is correct and continuous.
Since you MUST control the shutter speed and not allow the auto exposure feature of your camera to change the selection, either Shutter Priority or Manual shooting mode is used.
So how do I focus on a moving subject? Good question. Because my location is fixed during the taking of these images, I have time to pre-set my focus. In the case of the softball runner, I was located along the first base line and was able to pre-focus my lens in MANUAL focus mode to the location shown in the picture. As a result, I only had to concentrate on the subject and take the picture as she entered my focus zone.
Another option is to use the CONTINUOUS Auto Focus mode provided on some cameras. In this case, the camera's auto focus system will "track" the subject and attempt to maintain focus as you are "panning" your subject. Either technique can be used, but I prefer pre-focusing to the point I anticipate taking the picture -- whenever I have the luxury of knowing the line of travel my subject will be taking.
Now you're ready for the next NASCAR race.
In my next post, I will discuss creating the same effect using the computer.
Any questions or comments? Let me know.


1 comment:
thanks for the tip. i love panning and its really cool when you capture it perfectly.
Post a Comment