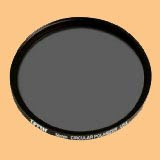
Friday, August 29, 2008

Photo Equipment Tip - Polarizing Filter


You will find a few essential photographic filters in a professional's camera bag. Filters are used on the camera's lens for several reasons including:
  • To reduce UV light entering the camera to minimize atmospheric haze (UV and Skylight filters)
  • To intentionally reduce the amount of light entering the camera (neutral density filters)
  • To alter the color appearance (warming, cooling, fluorescent, etc. filters)
  • To create special effects (twinkle filter, soft focus filter, vignette filter, on and on and on)
  • To reduce glare and the effect of polarized light in an image (polarizing filter)
  • For lens protection (to protect the expensive front glass element and coatings of your lens)
Of these filters, the ones I recommend as "must haves" are UV (primarily as lens protection) and Polarizing filters. This post discusses the dramatic impact a polarizing filter can have on your photography with very little effort.

My metal cow picture helps illustrate the effect of a polarizing filter.

Metal cow shot without a polarizing filter

This image contains two photographic elements that polarizing filters are designed to enhance. Glare from a highly reflective surface (the cow) and the glare in the sky provided by the naturally occurring water droplets in the atmosphere. Both are shiny surfaces producing light reflections that are all traveling at the same wave length. We perceive this phenomenon as glare.

The picture below was taken using a polarizing filter:

Metal cow using polarizing filter
(no computer enhancement was applied to this image)

In this picture, the polarizing filter has dramatically reduced the naturally occurring glare in the atmosphere to reveal the deep blue sky with contrasting white clouds. In both pictures, the sky was blue and the clouds were white, but by using the polarizing filter in the second picture, the blue was enhanced and the clouds were made to stand out in stark contrast. (The clouds remained very white because the light coming from the clouds was not all at the same wavelength, and consequently nearly unaffected by the filter.)

A similar benefit is immediately achieved when you are taking pictures of water surfaces. This filter reduces the surface glare to reveal details below the surface. (Unless you're photographing the Hudson River.)

Using a polarizing filter is easy because the effect is seen through your viewfinder. No guessing. No special calculations. A circular photographic polarizing filter for your camera screws into the front threads on your lens. Unlike other filters, after the polarizing filter is installed it can be freely rotated to create the desired effect. In one position the filter has little or no effect, while turning the filter 90 degrees provides the maximum effect (rotating the filter aligns the filter 90 degrees to the wavelength of the glare light and causes the filter to absorb the glare's wave length).

Because the filter rotates, the effect is continuous. What I mean is that you can turn the filter to the position that visually enhances your image to the degree YOU think is best.

You see this effect in your daily life and may not have been aware of it. If you have a pair of polarizing sunglasses (which I highly recommend) and look at a blue sky, what happens to the sky color when you tip your head to the side? It becomes lighter because you're allowing more glare to pass through the sunglasses. The manufacturers of sunglasses make the assumption that you will be driving in a normal upright, sitting position. Consequently, they have aligned the polarizing filter for you in this sitting position. But when you lay on your side, the glare returns. (When my kids were little, I would use this trick to demonstrate their father's mastery of all things scientific. Of course, I was left without my sunglasses for the rest of the trip.)

Photographers aren't quite so lucky. Since filter manufacturers know that you might shoot a picture in virtually any position - literally, the filter must be allowed to rotate to the best glare reducing position. You make the rotation and alignment decisions based on what you see through the viewfinder.

In general the news is all good about a polarizing filter:
  • It reduces glare
  • It enhances the sky color and density in landscape shots
  • It increases overall color saturation slightly
  • It provides protection to your lens front glass element.
There are two downsides of note:
  • A polarizing filter is about the most expensive filter you can buy for your camera. I've seen a price range of $50 to $150 dollars. Ask any pro photographer and he/she is going to say, "It's worth the money."
  • A polarizing filter is dense. By this I mean the filter is a dark gray color (see picture at top of this post). You lose about 1.5 to 2 f/stops of light when you use a polarizing filter. This is not generally a problem (especially if you use a tripod -- like I preach). But be aware that your aperture and shutter speed will be wider and slower (respectively). This is a problem in lower light conditions. Fortunately, this filter is generally used in bright sunny conditions where there is ample light.
Many DSLR camera manufacturers offer polarizing filters for their family of lenses. Tiffen and Hoya are two filter manufacturers who also make a complete line of high quality photographic filters.

Digital Imaging Note: Some might say, "Well I could do this in Photoshop." If you are an experienced Photoshop user, that might be true. However, it would require some sophisticated masking and saturation/density adjustments to replicate this filter effect. I would counter by saying, "Why not just do it at the time the picture was taken. No digital image enhancement required. You see what you're getting immediately. And it's easy. And if you don't do your own digital computer enhancement, it's a no-brainer. Buy the filter.

I hope this helps you. You should be immediately rewarded with some exceptional outdoor/landscape shots. If you have any questions or comments, you know where to find me.

Wednesday, August 27, 2008

Equipment Tip - Lenses and Distance Distortion

I'm sure you've been asking yourself, "When is Hub going to show me how to take a picture of two basketballs at rest on a stone wall?" Well, today's your lucky day.

These two basketballs were shot using a 52mm (normal) lens.

To maintain my position of neutrality in the industry, I have intentionally selected a Spalding and a Rawlings basketball for this exercise in optical illusion. Actually I'm using these two basketballs to illustrate a photographic lens phenomenon associated with focal length - distance distortion.

The picture above was taken with my Canon DSLR's normal lens (52mm focal length). Notice the distance between the two balls. This distance was approximately what I saw with my own eye.

Contrast this image with the picture below:

This picture was taken with a 300mm telephoto lens.

I changed to a 300mm lens for this picture and moved my camera back until the first basketball appeared about the same size as it did in the first picture. I did NOT move the basketballs. Notice in this picture that the two balls "appear" to be much closer together. The rule is: the longer the focal length of a lens, the more it will compress the apparent distance between objects.

Here's one more example:

This picture was taken with a 17mm wide angle lens.

Again I changed lenses. In this case, I chose a 17mm wide angle lens. I moved the camera close enough to the first basketball to make it approximately the same size as the first picture. Now the distance between the two balls has "apparently" increased. However, I did NOT move the basketballs. The rule is: As the focal length of a lens decreases the apparent distance between objects increases.

The actual physical distance between these basketballs remained constant for all three pictures.

You see this optical phenomenon all the time on televised NASCAR or Indy races. The cars look as though they are stacked bumper-to-bumper from the head-on shot down the straight away (using a very long telephoto lens), but the side shot of the entire field reveals that the cars are 100 feet or more apart (using a wider angle lens).

You can use this optical reality in creative ways in your photography. Even if you're not after any special effect, you must remain aware that this distance distortion is always at play and changes as the focal length of your lens increases or decreases. (FYI: If you've examined the last picture taken with the 17mm lens closely, you'll notice that even the distance between the front and the back of the WNBA basketball itself has been distorted to give it that fat appearance. This is especially noticeable in the letters WNBA.)

Let me know if you have any questions or comments. You know where to find me.

Monday, August 25, 2008

Digital Darkroom Tip - Increasing Apparent Sharpness

Image sharpness is often the topic of photographic conversations and is always a concern when a picture is being considered for display or competition. You've probably spent time with the sharpening features of various software programs, and undoubtedly you have been preached the virtues of using a tripod whenever possible.

This post will provide a more subtle adjustment you can make to increase the apparent sharpness of your image without introducing unwanted artifacts into the image. The subject used this time is the flower shown in the picture below:

Here's the flower picture as it appears on my monitor using Adobe's Photoshop.

The flower was shot with the camera mounted on a tripod on a sunny day with very little wind to cause motion in the flower. My shutter speed was 1/500th of a second, and I manually focused the camera. So, the picture is about as sharp as the camera can produce. My aim is to produce the final image as an 11"x14" enlargement. My general rule for enlargements is: Do NOT enlarge an image beyond it original file size (interpolate) and use a PPI (sometimes mistakenly called DPI) setting of 240.

To see the initial sharpness of this image, take a look at the segment of the picture that has been enlarged on my monitor to 100%. (This original file was in RAW format. When I opened the file I used a minimal amount of sharpening to produce this image.)


The image looks sharp, but I want to increase the impression of sharpness without adding more sharpening with Photoshop's sharpening tools. It's easy to go overboard with sharpening and soon the edges of objects will begin showing the effect and it becomes obvious to the viewer that the picture is over sharpened. I can't tell you the number of times I have been on a jury panel for a photo contest and heard one or more of the judges say, "This picture has too much sharpening applied."

Compare the above enlarged image with the one below:

Hopefully, your monitor will allow you to see the subtle apparent differences in sharpness between these two enlargements. This second picture "looks" sharper to the eye. And yet this effect was created without the use of sharpening.

How's it done?

The apparently sharper picture was created by adding digital "film grain" to the image. "Film Grain" is a filter option in Photoshop. Most image editing programs contain a similar effect. The addition of a very small amount of digital film grain "tricks" the eye into believing the image is actually sharper. Below is the "film grain" setting I used for this second version of the flower picture:

As this menu illustrates, I used the lowest settings on the grain, highlight area and intensity sliders possible to add just enough believable (but not distracting) film grain to the image. The result is a picture that appears even more in focus than the original.

Try this technique on some of your images, and let me know what you think.

If you have questions or comments, you know where to find me. Good luck.

Sunday, August 24, 2008

Digital Darkroom Tip - Background Motion Blur

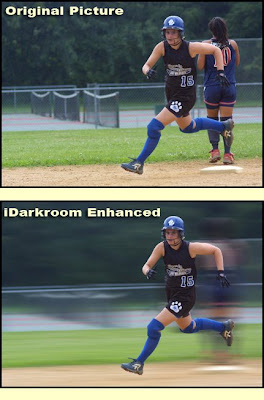
I have to admit that the softball runner example discussed in my last post was created in my digital iDarkroom. Creating an illustration for the purpose of explaining this background motion blur technique required a digital approach. Since I wanted to have a "before and after" picture, I could only replicate the exact scene in my iDarkroom. (The term iDarkroom is my short name for the evolving computer image editing and digital printing equipment and software that is rapidly replacing the traditional "wet" and truly dark rooms of the bygone era of film-based photography.)

The blurred background effect of the second picture was created using a combination of two Photoshop features: masking and the motion blur filter.

I use Adobe's Photoshop CS3 as my primary image editing program. The market offers a wide variety of imaging software with prices for every budget. I started with Photoshop, so I feel most comfortable with this software.

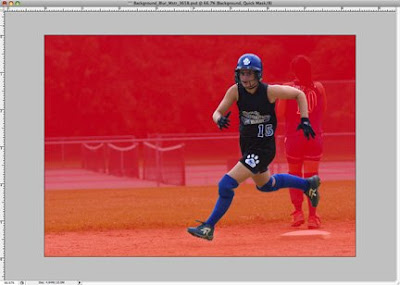
My first task was to isolate the runner from the background. This was done by creating a "mask". A mask defines the outline of the object(s) to be isolated. In Photoshop, several options are available for creating a mask. In this case, I used the "lasso" tool to outline the body of this runner:


The picture of my computer monitor above shows the isolated softball runner against the background (the area shaded in RED). To complete the motion blur effect, I used the following steps:
  1. With the runner "selected" (runner is surrounded by the marching marquee), I copied her image using Edit/Copy.
  2. The copy is then pasted into a new layer. (Now I have two layers. The background layer contains the ENTIRE original image. The second layer contains ONLY the runner.) In Photoshop when you perform an Edit/Copy and immediately perform an Edit/Paste the object is pasted into a new layer and overlaid into EXACTLY the same position as the original.
  3. I selected the background layer.
  4. Going to the "Filter" menu, I chose the Blur/Motion Blur Option. Because I selected the background layer the Motion Blur effect will only modify the background scene.
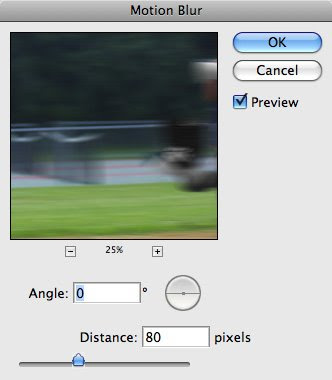
  5. In the Motion Blur window (below), I set the angle to zero degrees to ensure the effect would be parallel to the ground and the blur "distance" was set to 80. Click OK and the effect was completed:

If you check the "Preview" box (above), the effect of the "Distance" slider can be seen on the full computer image. Experiment by moving the slider until you find the amount of background blur that looks best for your image. It's easy to overdo digital effects and lose the photographic "look and feel". So less is generally best.

Because the isolated image of the runner is on a dedicated layer in FRONT of the background layer, her image remains sharp while everything behind her shows motion blur.

If you have questions or comments, let me know. You know where to find me.