You will find a few essential photographic filters in a professional's camera bag. Filters are used on the camera's lens for several reasons including:
- To reduce UV light entering the camera to minimize atmospheric haze (UV and Skylight filters)
- To intentionally reduce the amount of light entering the camera (neutral density filters)
- To alter the color appearance (warming, cooling, fluorescent, etc. filters)
- To create special effects (twinkle filter, soft focus filter, vignette filter, on and on and on)
- To reduce glare and the effect of polarized light in an image (polarizing filter)
- For lens protection (to protect the expensive front glass element and coatings of your lens)
My metal cow picture helps illustrate the effect of a polarizing filter.
This image contains two photographic elements that polarizing filters are designed to enhance. Glare from a highly reflective surface (the cow) and the glare in the sky provided by the naturally occurring water droplets in the atmosphere. Both are shiny surfaces producing light reflections that are all traveling at the same wave length. We perceive this phenomenon as glare.
The picture below was taken using a polarizing filter:
In this picture, the polarizing filter has dramatically reduced the naturally occurring glare in the atmosphere to reveal the deep blue sky with contrasting white clouds. In both pictures, the sky was blue and the clouds were white, but by using the polarizing filter in the second picture, the blue was enhanced and the clouds were made to stand out in stark contrast. (The clouds remained very white because the light coming from the clouds was not all at the same wavelength, and consequently nearly unaffected by the filter.)
A similar benefit is immediately achieved when you are taking pictures of water surfaces. This filter reduces the surface glare to reveal details below the surface. (Unless you're photographing the Hudson River.)
Using a polarizing filter is easy because the effect is seen through your viewfinder. No guessing. No special calculations. A circular photographic polarizing filter for your camera screws into the front threads on your lens. Unlike other filters, after the polarizing filter is installed it can be freely rotated to create the desired effect. In one position the filter has little or no effect, while turning the filter 90 degrees provides the maximum effect (rotating the filter aligns the filter 90 degrees to the wavelength of the glare light and causes the filter to absorb the glare's wave length).
Because the filter rotates, the effect is continuous. What I mean is that you can turn the filter to the position that visually enhances your image to the degree YOU think is best.
You see this effect in your daily life and may not have been aware of it. If you have a pair of polarizing sunglasses (which I highly recommend) and look at a blue sky, what happens to the sky color when you tip your head to the side? It becomes lighter because you're allowing more glare to pass through the sunglasses. The manufacturers of sunglasses make the assumption that you will be driving in a normal upright, sitting position. Consequently, they have aligned the polarizing filter for you in this sitting position. But when you lay on your side, the glare returns. (When my kids were little, I would use this trick to demonstrate their father's mastery of all things scientific. Of course, I was left without my sunglasses for the rest of the trip.)
Photographers aren't quite so lucky. Since filter manufacturers know that you might shoot a picture in virtually any position - literally, the filter must be allowed to rotate to the best glare reducing position. You make the rotation and alignment decisions based on what you see through the viewfinder.
In general the news is all good about a polarizing filter:
- It reduces glare
- It enhances the sky color and density in landscape shots
- It increases overall color saturation slightly
- It provides protection to your lens front glass element.
- A polarizing filter is about the most expensive filter you can buy for your camera. I've seen a price range of $50 to $150 dollars. Ask any pro photographer and he/she is going to say, "It's worth the money."
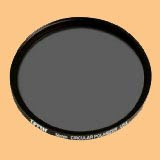
- A polarizing filter is dense. By this I mean the filter is a dark gray color (see picture at top of this post). You lose about 1.5 to 2 f/stops of light when you use a polarizing filter. This is not generally a problem (especially if you use a tripod -- like I preach). But be aware that your aperture and shutter speed will be wider and slower (respectively). This is a problem in lower light conditions. Fortunately, this filter is generally used in bright sunny conditions where there is ample light.
Digital Imaging Note: Some might say, "Well I could do this in Photoshop." If you are an experienced Photoshop user, that might be true. However, it would require some sophisticated masking and saturation/density adjustments to replicate this filter effect. I would counter by saying, "Why not just do it at the time the picture was taken. No digital image enhancement required. You see what you're getting immediately. And it's easy. And if you don't do your own digital computer enhancement, it's a no-brainer. Buy the filter.
I hope this helps you. You should be immediately rewarded with some exceptional outdoor/landscape shots. If you have any questions or comments, you know where to find me.


1 comment:
Good tips.
This is absolutely useful.
Keep posting.
Thanks.
Regards,
image masking services
Post a Comment