Showing posts with label DSLR. Show all posts

Monday, December 1, 2008

GPS Metadata For Your DSLR

It's becoming increasing popular to include location shooting information (GPS) in digital image metadata. Being able to insert GPS information with each digital image file ensures that the orignal location can be identified and shared in the future. Since the major camera manufacturers don't include this capability as a "built-in" function on their latest generation of DSLRs, there has been an increasing number of DSLR GPS solutions appearing on the Internet.

Many of these products rely on synchronizing the device's internal clock with the camera's timing circuit. These units are NOT attached to the camera and track your physical location while you're shooting by keeping a log in memory. When you return from your day of shooting and download your pictures, the software that comes with the GPS devices then writes the GPS coordinates into each image file based on the time recorded in the metadata of each image.

To this aging brain, this process seemed overly complex and easily corrupted if the times were not synchronized or something went wrong with either clock. I couldn't understand why a GPS device couldn't be attached to the camera and the GPS data be written to each image AS it was being shot. This would reduce the complexity to making sure the unit was attached to the camera and turned on.

Well, I found one. At least, I found a rugged unit that is designed to work with most Nikon cameras and Fuji's Pro S5. Since I'm a Nikon user for a good part of my work, I was delighted.


Geomet'r GPS Receiver

The unit is offered by Macsense and is called the Geomet'r GPS Receiver. It's about the size of an Apple Shuffle player. Best of all it attaches easily to the DSLR and has only one, non-confusing on-off button. The cost of the unit is $150. I ordered and received the unit within 5 days.


Geomet'r GPS Receiver attached to a Nikon D200

Shown above is the simple attachment of the GPS receiver to the accessory socket of a Nikon D200 (red circle). The on-off button is located on the socket connector (yellow circle). The unit also includes a velcorized bracket for placing the unit on the camera's flash shoe. I have gotten into the habit of attaching mine to my camera strap.

OPERATING INSTRUCTIONS: Turn on the GPS Receiver. Give the unit about 30 seconds to figure out where in the world it is currently situated. Take pictures.

That's it. As each picture is taken, the GPS location coordinate data is included in the metadata automatically.


Lightroom Metadata Window

Shown here is the metadata portion of Adobe's Lightroom Library workspace. The GPS and Altitude information were entered into this image file when the picture was taken (red box). The GPS data is now permanently embedded information that will always travel with the digital file.

Notice the small arrow at the right side of the red box. Click on this arrow, and here's what you'll see:


GPS Image Coordinates Shown in Google Maps

That's right. Google Maps opens in your browser to show you the exact location of the coordinates recorded in the image metadata.

How cool is that?

Now any picture service that makes use of GPS metadata (like Flickr) will be able to display the location where the picture was taken. Send your best vacation or creative photographs to members of your family, and they will be able to see your pictures and the location.

Things you need to know:
  • The Geomet'r draws its power directly from your camera's battery. This requires you to charge your batteries more frequently or carry spares. When not in use, TURN THE UNIT OFF or it will continue draining your battery.
  • Like any other GPS unit, the Geomet'r will not work reliably inside a building. In these cases, I take a picture of the outside of the building to have one image from the session with the exact coordinates. I can add this GPS data to the indoor images later in my digital editing program.
I have found the Geomet'r to be extremely accurate, reliable and rugged. So, if you have been looking for this capability and own a Nikon or Fuji DSLR, check out the Geomet'r.

Footnote: As of this post, Nikon has announced an accessory GPS unit similar in size and function to the Geomet'r called the GP-I. However, the pricing information is not readily available. I have seen price estimates ranging from $200 US to $800 US.

Friday, October 24, 2008

A Primer on Built-In DSLR Flash

I was amazed at how detailed the twinkling stars appeared as I was watched the first game of the 2008 World Series on an HDTV. Then I realized the game was taking place in the Tampa Bay Devil's enclosed Tropicana Stadium. Those weren't stars. They were thousands of individual electronic flashes capturing the first pitch of the game.

At that same instant, my mind flashed back to the first days of my photographic career when I managed a color lab and processed literally millions of similar pictures for amateur photographers. The events and pictures varied from Friday night high school football games from the top bleacher to parents recording their child's graduation from seat ZZ10, but the results were always the same -- great pictures of the backs of peoples' heads seated 3 to 4 rows in front of the photographer and no image of the event taking place 300 to 400 feet away.

The moral of the story is -- like Dirty Harry would say -- "a man (or woman) has to know his limitations." Limitations is the story of your camera's built-in, electronic flash. The camera's built-in flash is extremely convenient and useful within its effective range.


When taking a flash picture, the light rapidly spreads out to illuminate the subject (above). A portion of the light strikes the subject and is reflected back to the camera's lens. Because of the spreading of the light and the distance that light is required to travel (to and from the subject), much less light returns to the camera than was originally emitted by the flash unit. It's the returning light that determines the aperture setting needed for a correct exposure.

The illuminating power of a photographic flash unit is normally expressed as a guide number. A typical guide number for a flash built into today's DSLR is 40 feet at an ISO of 100. Photographers have used this guide number for years to determine the correct aperture setting (temporarily forget about the automatic flash function on your camera).

The math is simple. Divide the guide number by the distance from the flash to the subject. The result is the aperture setting. For example, a flash with a guide number of 40 and a distance to subject of 5 feet would require an aperture setting of f/8. (40 divided by 5 equals 8)

Back to the automation in your camera. DSLR cameras with an automatic built-in flash are capable of electronically determining the distance to subject and performing the math to set in the proper aperture setting.

So why did I drag you through this explanation and 4th grade math?

Knowing the guide number of your flash unit and this simple equation speaks volumes about what pictures you can and cannot take. If the subject in the example above had been 10 feet away from the camera, the required aperture setting would be f/4. (40 divided by 10 equals 4) This is probably very close to the maximum possible aperture setting of your camera. By the time the subject is 20 feet away from the camera, the required f/2 aperture setting isn't available on your camera. You have exceeded the effective range of the camera's built-in flash.


As shown in the illustration above, the typical effective range of the built-in flash units in today's DSLRs is from 10 feet to 20 feet. As you exceed the maximum effective range of the camera's flash, the subject will become increasingly underexposed (darker) until it is completely lost.

Remember using a telephoto lens does NOT help this situation. The effective range of flash illumination is always determined by the distance of the flash unit to the subject -- regardless of the lens being used.

Estimating the average distance from the bleacher seats to the pitcher's mound at Tropicana Stadium to be 300 feet to 500 feet or more, is it any wonder why these pictures never turn out as expected?

Even most professional external electronic flash units can't take this picture. A typical pro unit might have a guide number of 150. Doing the guide number math with this guide number yields a maximum flash-to-subject distance of 50 feet to 60 feet. (Probably explains why professional sports photographers are seldom found taking pictures of night games from the bleacher seats.)

But someone will say, "Hey, I took a similar picture, and it didn't look too bad." Truth be told, in these instances, the flash played NO visible role in the exposure. What produced the image was the available light provided by the stadium's lighting -- not the flash unit. Certainly the photographer saw the flash fire, but not enough light returned from the subject to make any visible exposure. It was the stadium light that made the picture possible.

If you find yourself in one of these seemingly impossible situations, try turning off the flash and use the light that's available in the arena. It may be necessary to increase the ISO setting to 800 or higher, but it's better than losing the picture opportunity.

Note: Guide numbers are directly related to the ISO setting of the camera. The higher the ISO setting the greater the effective distance of the flash unit becomes. This alternative provides a small gain in effective distance, but the trade off will be pictures that show more and more visual noise (grainy appearance) at each higher ISO setting.

One final cautionary note: Light emitted by the built-in flash unit "spreads out" at all angles when fired. One of these directions is downward.


Flash shadow created by a wide angle lens

This becomes important when using wide angle lenses. The flash picture above was taken with a lens that was too wide for the camera's flash. The result is the shadow seen on the lower half of the wall. The dark area is actually the shadow created as the light was interrupted by the top of the lens. Your camera's manual will indicate the maximum wide angle lens to be used with the camera's flash unit.

I will end this article with two other examples from my days managing a color lab for amateur photographers and processing thousands of pictures everyday. The first occurred when I covered the premier showing of the Star Trek movie for a local newspaper. After two decades of absence from TV, this movie was long anticipated. Sitting in the darkened theater, I couldn't believe my eyes when Captain Kirk first appeared on the screen and dozens of flash pictures were taken. You can't light up light. I saw those pictures pass through the lab the next day. What did these photographers get in return? Pictures of a completely white screen.

The second example occurred every day with a stream of flash pictures people would take of their TV screens. What did they get? Nothing but pictures of a bright flash reflected from the glass of the TV screen.

Know the limitations of the flash.

Thursday, October 9, 2008

Shooting Tip - Black and White DSLR Photography


Shoot in color. Convert to black and white in the computer.


Thought I'd get right to the point. Once again, the beauty and simplicity of the black and white image is making its "every 20 years" resurgence. I, for one, am delighted to see this revival. There's something delicate and emotionally compelling about a good black and white photograph that color cannot always convey.

This difficulty in shooting with a black and white image in mind is learning to "turn your color vision off". Learning to see the subtle changes in grays and the important role light plays in each picture is challenging. Taking up the challenge will not only lead to a new skill and admiration for the black and white photo, but it will also improve your color photography.

When black and white was the only choice for photographers, the ability to "think in black and white" was quickly learned. Today, that learning process can take place in front of your eyes on the computer's monitor. When starting down the black and white road, spend time looking at your existing library of color images and convert them back and forth between color and black and white to observe the differences. What happens to trees, rocks, wood, sky, people, details, shadows, highlights, etc. when the color is eliminated? This exercise will begin to train your eye and mind to make the same conversion when you're shooting in the real world.

Now... go to the library. Yes, I said the library -- not the Internet. Look up the works of some of the masters of black and white photography. Ansel Adams is a good place to start. Study these images to gain an insight into how the masters interpreted their world in terms of black and white. I recommend the actual library book because the images in these books were usually printed under the guidance of the photographer. The images in these books reflect how the photographer wanted you to experience his vision. Much of the subtlety and impact can be lost when viewing the same images on your monitor from an Internet photo collection.

So, here's a color image that I took with the intention of producing a black and white photograph. I followed all the rules of exposure (see Hub's Camera primer for "Exposure Is Everything", Parts 1a and 1b) to produce an acceptable and printable color image.


Old Grist Mill, Clark County, Washington

In my image editing program, Photoshop CS3, I used the black and white conversion option under the "Image/Adjustments" menu. In the case of Photoshop CS3, the conversion of color to black and white has been enhanced to allow individual color intensities in the original image to be altered during the change from color to black and white. For example, I could lighten the trees in this picture by adjusting the green channel. Not all image editing programs have this enhanced capability, but all should have an option to convert your color image to black and white. That's OK. Here's my converted image:


Old Grist Mill, converted to B&W in Photoshop

This is what I "saw" with my black and white vision when I was on location. You'll often hear experienced photographers call this "pre-visualizing the image." They have the ability of seeing the color, tones and details of this image in their minds in shades of black and white. That's a very good thing. But take heart, it's a learned skill that you can master. Practice, practice, practice.

As you train your eye, you will learn to pre-visualize the final picture in many forms. Here's a variant of the same image toned to mimic old-style antique toning processes:


Old Grist Mill, toned in Photoshop CS3

In this version of the original photograph, the scene is reproduced in shades of black and brown to render a different look and feel to the image. The possibilities are nearly endless. The trick is learning to see them as you are taking the picture.

I started this discussion by saying "shoot in color and convert to black and white in the computer." Some DSLR cameras have a black and white option in their menus. If you select this option, no color will be recorded -- just shades of gray.

However, you never know when you might want this picture in color for some other purpose. So shoot the picture in color and then convert the image in your computer and SAVE it under another name. This way you'll always have the original color photograph to use later.

If you have questions or comments, please let me know.

Wednesday, August 27, 2008

Equipment Tip - Lenses and Distance Distortion

I'm sure you've been asking yourself, "When is Hub going to show me how to take a picture of two basketballs at rest on a stone wall?" Well, today's your lucky day.

These two basketballs were shot using a 52mm (normal) lens.

To maintain my position of neutrality in the industry, I have intentionally selected a Spalding and a Rawlings basketball for this exercise in optical illusion. Actually I'm using these two basketballs to illustrate a photographic lens phenomenon associated with focal length - distance distortion.

The picture above was taken with my Canon DSLR's normal lens (52mm focal length). Notice the distance between the two balls. This distance was approximately what I saw with my own eye.

Contrast this image with the picture below:

This picture was taken with a 300mm telephoto lens.

I changed to a 300mm lens for this picture and moved my camera back until the first basketball appeared about the same size as it did in the first picture. I did NOT move the basketballs. Notice in this picture that the two balls "appear" to be much closer together. The rule is: the longer the focal length of a lens, the more it will compress the apparent distance between objects.

Here's one more example:

This picture was taken with a 17mm wide angle lens.

Again I changed lenses. In this case, I chose a 17mm wide angle lens. I moved the camera close enough to the first basketball to make it approximately the same size as the first picture. Now the distance between the two balls has "apparently" increased. However, I did NOT move the basketballs. The rule is: As the focal length of a lens decreases the apparent distance between objects increases.

The actual physical distance between these basketballs remained constant for all three pictures.

You see this optical phenomenon all the time on televised NASCAR or Indy races. The cars look as though they are stacked bumper-to-bumper from the head-on shot down the straight away (using a very long telephoto lens), but the side shot of the entire field reveals that the cars are 100 feet or more apart (using a wider angle lens).

You can use this optical reality in creative ways in your photography. Even if you're not after any special effect, you must remain aware that this distance distortion is always at play and changes as the focal length of your lens increases or decreases. (FYI: If you've examined the last picture taken with the 17mm lens closely, you'll notice that even the distance between the front and the back of the WNBA basketball itself has been distorted to give it that fat appearance. This is especially noticeable in the letters WNBA.)

Let me know if you have any questions or comments. You know where to find me.

Thursday, August 14, 2008

Equipment Tip - Which DSLR should I buy?

Having the benefit of a career full of good and bad photographic experiences to draw on but answering to no camera sponsors, I feel I can be neutral about camera brands and focus on features that I would ask you to consider as you research buying your DSLR. Ultimately, your personal preferences and the size of your pocketbook will determine your selection. I will not be advising you to buy a Nikon, Canon, Pentax, Olympus, Fuji or Sony DSLR. But do keep these facts in mind during your research.

To be perfectly clear, I am aiming my comments toward those purchasing a Digital Single Lens Reflex camera -- affectionately known as DSLRs. This class of cameras is used both by amateurs and professionals and is among one of the fastest growing segments of the photographic industry. Today's DSLR cameras generally share these minimum features:
  • The ability to interchange lenses (i.e., normal, zoom, wide angle, telephoto).
  • A light collecting sensor to capture the image (exposure) -- typically a CCD (charge-coupled device) - providing image files from 8 to 24 megapixels in size.
  • The ability to view and compose an image while looking through the camera's taking lens to see precisely the image that will be captured (not through a viewfinder which is set off to the side and has its own secondary "window on the scene").
  • A built-in light meter and computing power capable of measuring the available light and automatically adjusting the camera's light controls (aperture and shutter) to their optimum settings based on the photographer's pre-set requirements.
  • The ability to review an image immediately after the picture is taken.
  • The ability to store image files on one of the many data card formats available (today's equivalent to traditional film).
  • A built-in flash for low light or indoor photography.


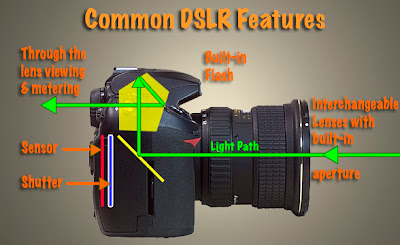
This picture of my Nikon DSLR (taken with my Canon DSLR)
illustrates the features common to DSLR cameras.

Those are all the features a camera requires to be classified as a DSLR. However, most manufacturers add significant enhancements to these basics in their more advanced models. But be forewarned, the more enhancements incorporated the more the camera will cost.
  • Higher resolutions - capturing more pixels of information for each picture taken (6 to 8 megapixels is normal for the lower priced DSLRs while 10 to 24 megapixels per image is the range for the higher end DSLRs).
  • More photographer controls to override or enhance the camera's automated exposure system.
  • Higher images (frames) per second rates allowing high speed photography at 8 frames or more per second.
  • More selections of shutter speeds (from extremely slow to very fast).
  • More flash photography options including connections for external flashes.
  • Enhanced information displays including histograms (graphic representation of each exposure).
  • Some cameras now offer full 35mm frame coverage to match traditional film 35mm cameras and provide a larger area of coverage as well as a larger final image file size.


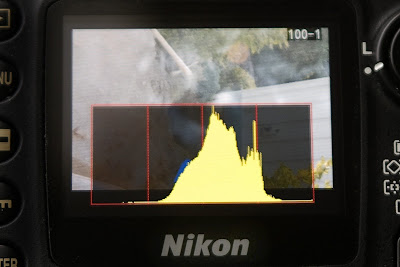
When researching your DSLR purchase, make sure the camera you are considering has the capability to display a "histogram" superimposed on the preview image (Nikon camera sample shown above) after each picture is taken.


The list goes on and on with more features on the next generation drawing board. For example, it won't be long before GPS technology is fully incorporated into DSLRs. When this happens, the exact location of each picture you take will be "written" into the digital image file. Using services like Google Maps, you'll not only be able to share your pictures online with your family and friends but you'll also be able to provide a map to the exact location. Pretty cool.

But for now, you need to decide what features you are looking for in a camera and the price range you can afford.

Start the process by knowing that all name brand DSLR cameras are GOOD. If you've always loved Simon and Garfunkel's Kodachrome then you might be predisposed to Nikon cameras. Or, if you've noticed a long line up of gray colored telephoto lenses being used by photojournalists on the Super Bowl sidelines, you might be leaning towards Canon cameras. Of course, there's always the cameras that your friends are using and recommending.

In these cases as with other respected brands like Pentax, Olympus, Fuji and Sony, the basic DSLRs they offer are very good digital cameras. Knowing that it's hard to make a bad choice, I would suggest you do the following:

  • Put together a list of "must haves" and "nice to haves" for your dream camera.
  • Determine in advance the most money you want to spend for the basic camera.
  • Visit a camera shop that has several camera brands.
  • I find that camera shops have more technically savvy sales staff. So let your salesperson know the type of pictures you want to take with your camera. Share your list of "wants". Then take a close look at the cameras these helpful folks recommend.
  • Don't stop there. Ask to see some of the comparable cameras from other manufacturers. You need to get the "feel" of the cameras. You will have to live with your purchase for several years. So make certain the camera is comfortable in your hands and that the various controls are easy for you to reach and manipulate.
  • In the same manner, check to make sure the information displayed in the viewfinder and on the camera's LCD displays are easy for you to read and make adjustments from.
  • Take your time. With your mind overwhelmed with information... go home... take a day or two to absorb this information... and do some Internet research. This "cooling down period" should bring an adequate dose of objectivity to your final purchase decision.
I would also suggest that your list of digital camera "musts" include at least the following:
  • 8"x10" prints are typically the largest size most often printed by first time photographers. With this in mind, a camera capable of shooting pictures in the 8 to 10 megapixel range will provide ample image information to provide sharp prints up to 11"x14" in size.
  • The capability to show a "histogram" on the camera's image preview screen immediately after you take each picture.
  • The ability to allow you to select between auto, manual, aperture priority and shutter priority modes.
  • The ability to store images in RAW format.
  • A flash "shoe" that allows you to eventually mount an external flash on your camera. (All suggested cameras will likely come with a built-in flash.)
  • A manual depth of field preview button.
  • The ability to accept a shutter release cable.
  • Most cameras automatically include computer connection hardware, software and a battery charger, but check to make sure.
The good news is that even the least expensive DSLRs contain most of the items on my "must" list. Spending more money will provide advanced features and greater image file sizes (more pixel density in each digital image for larger prints) which you may or may not use -- depending on the growth of your photographic interest. (That range of photographic interests currently translates in dollars to cameras priced from approximately $500 to $6,000.)

Overspending is easy. Just be aware that even the lower priced DSLRs from major camera manufacturers take excellent pictures and afford you exceptional flexibility in the types of pictures you can take.

Whatever your camera decision, please be loyal to the store that spent their valuable time educating you. Too often have I seen camera buyers consume hours of store personnel time to see every available camera while picking the staff's brains for technical insights, only to discover later that the buyer went somewhere else to make the final purchase. If the store personnel have truly been courteous and helpful, reward them with your purchase. Believe me, even if you pay a little more for the camera, your loyalty will be repaid generously every time you need help or support. These folks will quickly become your most trusted photographic friends.

If the terms "histogram" and 'RAW format' are new to you, and you are wondering why I consider these features a must for every photographer, please review my "Hub's Camera Blog" for a detailed explanation. It's important. URL: www.hubbardcamera.com

In the next post, I'll provide my TIP for your second most important camera accessory purchase.

As always if you have questions or comments, just let me know.