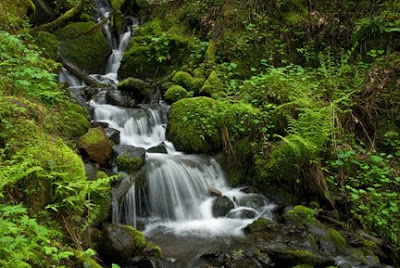
The technique isn't difficult, but demands the use of a tripod and patience. For those just beginning in photography, the mere exercise of using this technique is a great learning experience and the results are almost always rewarding.
The secret is NOT to use a shutter speed that will freeze the movement of the water. This means a slow shutter speed is intentionally used. It's this slow shutter speed that dictates the use of a tripod. The actual shutter speed is determined by two factors:
- The speed of the flowing water. The slower the water is flowing, the slower the shutter speed must be set.
- The amount of detail you want to remain in the water flow. As the shutter speed decreases, less and less detail will be seen in the water.
- Use the rules of exposure to determine my ideal exposure to provide the highlight and shadow detail required. (See Hub's Camera blog for an in-depth discussion on the rules of exposure.)
- Decide how much depth of field is required in the scene. This decision will provide the minimum f/stop required. (See Hub's Camera blog for an in-depth discussion on depth of field.)
- Decide how much blur I want in the final picture. This decision will provide the shutter speed I must use.
- Convert my ideal exposure to an actual shooting setting. In this stage, I'm ensuring that the depth of field required and the correct amount of blur will be captured in my image.
- I determined (setting aside all depth of field and motion considerations for the moment) that the ideal exposure is 1/60th of a second at f/2.8. (The scene was in the woods and in deep shade.)
- Using my camera's depth of field preview button, I could visually see that I needed an f/stop of at least f/16. (I wanted everything in the picture to be in focus.)
- The water was flowing rapidly, and I wanted very little detail in the water flow and decided a shutter speed of 1/2 of a second was sufficient.
- When I converted my original "ideal" exposure of 1/60th of a second at f/2.8 to these parameters, my final settings were 1/2 second at f/16. (This shutter speed/f/stop conversion goes like this: 1/60th @ f/2.8 to 1/30th @ f/4 to 1/15th @ f/5.6 to 1/8th @ f/8 to 1/4 @ f/11 to 1/2 @ f/16.)
It's obvious that hand-holding the camera with an exposure of one half of a second is NOT an option. So a tripod is essential. In this way, only the water will show motion while the rest of the picture will remain tack sharp.
As I've said before, good photography is work. This process takes time. But as you gain experience with this technique, your set up and shooting process will become faster. Also, the rather subjective decision as to which shutter speed produces the best motion effect will become second nature over time. Anytime you have a doubt about the effect a shutter speed will yield, shoot more pictures at different shutter speed settings. (Don't forget to adjust your f/stop each time you change your shutter speed.)
You've already taken the time to carefully take your first picture. As long as you are set up, take extra pictures at different shutter speeds and f/stop settings. When you return home, evaluate all of these different versions on your computer monitor. You'll soon discover your own preferences.
So, give it a try, and let me see some of your results. I would love to see your work.
As always, if you have any questions or comments, you know where to find me.


1 comment:
Hub, thanks for all of these great lessons. I've been researching photography in anticipation of my soon coming Christmas present (my first DSLR). You are an inspiration, and I'm looking forward to applying what I've learned here.
Post a Comment