Thursday, October 9, 2008

Shooting Tip - Black and White DSLR Photography


Shoot in color. Convert to black and white in the computer.


Thought I'd get right to the point. Once again, the beauty and simplicity of the black and white image is making its "every 20 years" resurgence. I, for one, am delighted to see this revival. There's something delicate and emotionally compelling about a good black and white photograph that color cannot always convey.

This difficulty in shooting with a black and white image in mind is learning to "turn your color vision off". Learning to see the subtle changes in grays and the important role light plays in each picture is challenging. Taking up the challenge will not only lead to a new skill and admiration for the black and white photo, but it will also improve your color photography.

When black and white was the only choice for photographers, the ability to "think in black and white" was quickly learned. Today, that learning process can take place in front of your eyes on the computer's monitor. When starting down the black and white road, spend time looking at your existing library of color images and convert them back and forth between color and black and white to observe the differences. What happens to trees, rocks, wood, sky, people, details, shadows, highlights, etc. when the color is eliminated? This exercise will begin to train your eye and mind to make the same conversion when you're shooting in the real world.

Now... go to the library. Yes, I said the library -- not the Internet. Look up the works of some of the masters of black and white photography. Ansel Adams is a good place to start. Study these images to gain an insight into how the masters interpreted their world in terms of black and white. I recommend the actual library book because the images in these books were usually printed under the guidance of the photographer. The images in these books reflect how the photographer wanted you to experience his vision. Much of the subtlety and impact can be lost when viewing the same images on your monitor from an Internet photo collection.

So, here's a color image that I took with the intention of producing a black and white photograph. I followed all the rules of exposure (see Hub's Camera primer for "Exposure Is Everything", Parts 1a and 1b) to produce an acceptable and printable color image.


Old Grist Mill, Clark County, Washington

In my image editing program, Photoshop CS3, I used the black and white conversion option under the "Image/Adjustments" menu. In the case of Photoshop CS3, the conversion of color to black and white has been enhanced to allow individual color intensities in the original image to be altered during the change from color to black and white. For example, I could lighten the trees in this picture by adjusting the green channel. Not all image editing programs have this enhanced capability, but all should have an option to convert your color image to black and white. That's OK. Here's my converted image:


Old Grist Mill, converted to B&W in Photoshop

This is what I "saw" with my black and white vision when I was on location. You'll often hear experienced photographers call this "pre-visualizing the image." They have the ability of seeing the color, tones and details of this image in their minds in shades of black and white. That's a very good thing. But take heart, it's a learned skill that you can master. Practice, practice, practice.

As you train your eye, you will learn to pre-visualize the final picture in many forms. Here's a variant of the same image toned to mimic old-style antique toning processes:


Old Grist Mill, toned in Photoshop CS3

In this version of the original photograph, the scene is reproduced in shades of black and brown to render a different look and feel to the image. The possibilities are nearly endless. The trick is learning to see them as you are taking the picture.

I started this discussion by saying "shoot in color and convert to black and white in the computer." Some DSLR cameras have a black and white option in their menus. If you select this option, no color will be recorded -- just shades of gray.

However, you never know when you might want this picture in color for some other purpose. So shoot the picture in color and then convert the image in your computer and SAVE it under another name. This way you'll always have the original color photograph to use later.

If you have questions or comments, please let me know.

Sunday, October 5, 2008

Hub's Visionary Photographers Blog Launches Today


Today is the official announcement and opening of
Hub's Visionary Photographers blog.

The articles presented in this blog are contributed by today's leading photographers, photo educators and photographic authors. (That's right. You won't be subjected to my writings.) Here you will find the wisdom, words and images of those photographic luminaries who are defining the art of photography in a digital world and leading us to new levels of visual expression. Each Visionary has a sincere and burning desire to help the next generation of creative photographers.

As with all my photography blogs, it's FREE. Just lots of great information, insight and inspiration for anyone serious about photography and who wants to learn more about today's photographic heros.

So, check it out and sign up for a feed or immediate email notification of new articles.

Monday, September 22, 2008

Compact Flash Cards - Digital Film

Compact Flash (CF) cards are the predominant in-camera, storage media for the majority of modern DSLR cameras. This post looks at Compact Flash cards and the jargon you will encounter when making a purchase decision.


The original compact flash by IBM (left) and a current CF card sold by Calumet Photo

Compact flash card are miniature hard drives that have been optimized for use in today's high performance DSLRs. Currently CF cards are readily available with storage capacities from 1 megabyte to 64 gigabytes. (Because of the ever decreasing cost of these cards, CF cards lower than 1 gigabyte are more difficult to find and rapidly disappearing.)


Type II CF card (left) and Type I CF card (right)

CF cards come in two flavors: Type I and Type II. The difference is thickness. Type II cards are thicker than Type I. (5mm vs. 3.3mm respectively). Your camera manual will tell you if you are limited to Type I or Type II.

The original IBM compact flash card has a place in history because every subsequent advancement uses the writing speed of the original as its speed measurement base. (This is the same tactic taken by CD manufacturers when citing writing speed -- comparing the newest CD to the original Compact Disks.)

The speed of the original IBM CF Type II was 150,000 bytes per second. Today CF cards can be purchased with 305X write speeds. That's 305 times the original 150,000 bytes per second or 45 megabytes per second.

It's obvious that as the megapixel count on DSLR image sensors increase, the files stored on CF cards are becoming larger and larger. So higher storage capacity certainly makes sense -- unless you like changing CF cards or downloading images every few shots.

But what about the increases in write speed? Why is this important? Well, write speed of a CF card ultimately determines how quickly a modern DSLR can release an image from its internal memory. And this is very important when shooting in "continuous" mode (sometimes referred to as sports shooting mode). The number of images your camera can take in rapid succession is in large part determined by how fast the previous file(s) can be written to the CF card and eliminated from the camera's memory. With some high-end DSLR cameras having the capability of taking 10+ images per SECOND, the bottleneck to continuous shooting becomes the speed the CF card is able to accept and write image data.

For most mid-range DSLRs currently on the market, a speed rating of 133x and up should keep up with the data throughput demands of the camera in continuous shooting mode. Of course, this will change tomorrow as faster cameras are introduced.

Beware of CF card prices that seem too good to be true. They probably are. Double check the specifications of these bargain cards to ensure that they meet the parameters of this discussion. If you aren't provided specs, don't buy the card.

If you have questions or comments, please let me know.

Never Stop Learning


Photography student at the Santa Fe Workshop

One of the most frequently asked questions I encounter from "freshman" photographers around the country is, "Where and how can I learn more about photography?" Two qualifiers are often attached to this question:
  • "that doesn't require me to have years of shooting and technical experience"
  • "that doesn't cost too much".
Obviously, the Internet offers some of these learning opportunities. Even sites that are primarily driven by a more technically oriented membership have sections devoted to beginning photographers. One such site is dpreview.com. Among the many forums hosted by DPREVIEW is an area devoted to "Beginner's Questions". What's most appealing about this forum is the willingness of the most experienced photographers to share their knowledge. Having followed this forum for many years, I have observed that there has been no question left ignored, unanswered or considered too basic. In fact, if you post a question on this forum you are likely to receive dozens of comments/replies within the first few hours.

As much as I admire these Internet educational sites and the service they perform, they (including this blog) are no substitute for hands-on guidance in photography. So I would like to offer some suggestions that provide the beginning photographer with live and in-person opportunities for a more personal photographic learning experience.

Camera Clubs

Virtually every community has at least one camera club. Camera club meetings can occur once or twice each month and the membership usually includes all levels of photographic experience -- beginner to professional. Membership fees are nominal, but well worth the investment. Since these organizations were established to foster and nurture photography, they are designed to cater to the needs of the new photographer. Most importantly everyone at a club meeting shares your love of photography and insatiable appetite to learn more.

A large portion of these local camera clubs belong to regional organizations called Councils. These Councils coordinate group activities, newsletters, educational seminars and photo competitions that individual camera clubs alone could not afford to develop or manage. If you enter, "camera club councils" into Google, you will likely find a Council that covers your location. The council websites contain a list of member clubs in your area as well as the contact information. Here's one such Council that I have grown to admire over the years for the activities and information they provide their member clubs -- The New England Camera Club Council. The NECCC covers the northeast U.S. and conducts one of the largest and most anticipated yearly conventions and educational events in the country. Take a look at the NECCC to get a flavor for what a camera club membership can mean for you.

You might also consider joining the Photographic Society of America. PSA is the mother organization for camera club Councils. PSA has an entire program specifically focused on the new member/new photographer. Their website is a collection of the best ideas and educational opportunities available. Member galleries afford you the opportunity to explore the work of other serious amateurs and learn from their experiences.

Local Community Colleges

The most frequently overlooked educational opportunity is in everyone's backyard -- your local community colleges. These institutions routinely offer credit and non-credit classes that range from basic to advanced photography subject matter. In many cases, the teachers are area working photographers who know your location and are a part of your community. These classes not only bring together photographers of similar skill levels, but people who are your neighbors. Fellow students can become lifelong friends and an "ever present" local resource of photographic knowledge. Community colleges may be the home of "user-friendly education" because students attending these adult education classes all share a similar passion and skill level ... and are all seeking the same answers.

I recently ran a Google search on "community college, photography" and received 2.26 million hits. Statistically speaking there's a high probability that you have a community college option in your area. The cost of a 6 to 10 week basic photography course is usually in the same range as membership in a camera club.

Specialized Photographic Workshops and Seminars

Several well respected private photographic workshops are available around the country. Nearly every one of these workshops is situated in a picturesque location. Again the range of student photographic expertise varies. These workshops make a business of developing and offering sessions that are geared to all levels of experience.


Students at the Santa Fe Workshop reviewing a famous photographer's portfolio

These workshops also represent the most expensive learning option. That said, it's money well spent. I have always considered workshops to be exciting photographic vacations. Viewed as a major vacation event, workshops are no more expensive than any other week-long vacation you might be contemplating. More importantly, the educators at these sessions are among the most respected photographers of our time. Spending a week with one of these photographic luminaries and fellow photographers in a small, focused class environment is a once-in-a-lifetime experience that is well worth saving your money to attend.


Two such organizations that I have personally experienced and admire are:
  • The Santa Fe Workshop - Located in Santa Fe, New Mexico. The director of the Santa Fe Workshop works tirelessly to ensure each year's selection of classes contains a who's who of respected photographic instructors, and that each session is packed with hands-on learning and personal critiquing opportunities. A complete digital darkroom is available as well as exposure to the latest photographic equipment. Sessions are conducted throughout the year. Attending a Santa Fe Workshop week-long session should be on your "Bucket List".
  • The Nikonians - Providing seminars and shooting events throughout the U.S. and Europe. The Nikonians is an independent organization for Nikon DSLR owners of ALL skill levels. Most Nikonian seminars are one or two day events that take place across the country. In addition, the Nikonians offer frequent guided photographic expeditions to some of the most photographic areas of the U.S.
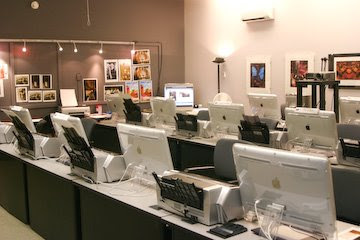
Santa Fe Workshop's fully equipped digital darkroom provides students the experience of using and learning on the latest in imaging technology.


Nikonian founders on location during a recent expedition to the Grand Tetons

Many professional photographers supplement their income by conducting seminars around the country. Googling "photo seminars" reveals a long list of area events by these photographers. Private seminars usually cost a little more and are generally designed to cover a specific aspect of photography (for example, landscape photography, portrait photography, digital printing, workflow, etc.)

Most successful, customer-focused camera shops understand the PR and financial advantages that photo classes provide their businesses. So check your area camera shop for a list of upcoming classes. Most of these seminars are short (one day or less) and range from free to a very small admission charge -- a real bargain.

Photo Art Galleries/Exhibits


Exhibits of the works of today's master photographers (like this Douglas Kirkland exhibit) travel to special events and galleries all over the country.

Nearly every community features photographic exhibits throughout the year. Venues include established art galleries to county fairs and from libraries to camera shops. Spotlighted photographers can be local, national or international. Take every opportunity to visit photographic exhibits. Learn from the work of others. You'll likely find a style and subject matter that's in tune with your personal taste. Learning from the works of others is certainly the highest form of flattery and provides beginning direction to your own photography.

Photo-Centric Conventions/Trade Shows


Trade shows are prime locations for seeing the latest photo technologies and learning from the manufacturers' experts.

If you want to be overwhelmed with the latest information and technology, attend a photo-specific convention that includes manufacturer booths/exhibits. Naturally, the manufacturers' goal for participating in these trade shows is to SELL. However, you are guaranteed to find the best photographic experts from each company at these shows. They are especially sensitive to the beginning photographer and accustomed to answering the most basic to the most technical questions. And, best of all, you get to play with the newest equipment and technology. It's definitely an educational and "wish list" opportunity.

High on the list of "must attend" trade shows for photographers is Photo Plus Expo held at the Javits Center in New York City each October. PPE brings virtually every photo manufacturer together to display their wares. You'll find some of the most prestigious photographers on the planet conducting on-site seminars and exhibiting their art. New York is, without a doubt, the center of the photographic world, so expect to be one of about 60,000 attendees while enjoying a fantastic photography adventure.


Renowned photographer Albert Watson inspires a standing room only crowd of over 300 admiring photographers at the 2007 Photo Plus Expo in NYC

Similar, but smaller, trade shows/conventions are conducted year-round throughout the U.S. Attending one trade show each year will keep you abreast of advancements in our craft and expose you to many exceptional on-site, sponsored seminars tailored to your interests. Some of these events include:
  • North American Nature Photography Association (NANPA)
  • MacWorld
  • Photo manufacturer's association (PMA)
  • Wedding and Portrait Photographers International (WPPI)
  • Imaging USA (the Professional Photographers of America annual gathering and trade show)

Do-It-Yourself

I include this classification to remind every beginning DSLR user that real learning takes place every time you pick up your camera. I learn something nearly every time I shoot a picture. It's these personal occasions that allow me to experiment with the lessons I have learned from any of the above events. There's no better teacher than experience. The more you shoot, the more you learn. Take notes when you shoot, and download/review every picture.

So the answer to the question is: There's a world of hands-on photographic learning opportunities for the beginning photographer. And, there is always something happening near you.

I hope you are able to experience a few of these educational events. It's all part of the fun of your new-found art form.

If you have questions or comments, feel free to contact me.

Tuesday, September 9, 2008

The Cheap Photo Studio

Putting aside the possibility of exposing how basically cheap I can be, this post discusses one way you can construct a table top studio in your own home. The idea for this post came from my recent experiences as a blog writer.

I knew from the onset that, to be truly useful to the beginning photographer, the information I supplied on this site demanded photos that clearly illustrated the material being presented. I also knew that in most cases, the photos would be of small, camera size objects. Ideally the studio set up would be close to my computer, so I could quickly snap an image, import the file into my computer and marry it with my blog content.

I have large studio access some distance from my computer, but the answer for me was to create a small table top studio that was within arm's length of my digital darkroom. As I looked at the commercial options, it seemed that most appropriate table top studio kits cost $100 or more. Since my blogs are without financial support and I don't sell anything, spending $100+ seemed excessive.

I decided to explore a home-brewed alternative and construct my own mini-studio. Here's how it came together.

My first concern was lighting. I wanted relatively soft lighting that approached the color temperature of daylight to reduce my white balance concerns. Spending time at my local Home Depot lighting department, I found one of those new fangled fluorescent replacement bulbs in 100 watt equivalent that was balanced for daylight:


My Home Depot 23 watt daylight fluorescent bulb produces the equivalent light level
as a 100 watt conventional bulb. Cost: $4.50 each.


Since the physical area of this table top set up is only about 6 square feet, three 100 watt equivalent bulbs provide ample light for exposures made with a tripod-mounted camera. (My average exposure has been 1/60th of a second at f/8. Fast enough and plenty of depth of field.)

Next I toured the automotive department where I found a budget bin containing "clamp on" utility lights with a silver reflective surface. I bought three of these light fixtures for $3.98 each.


The Home Depot clamp on utility light with daylight fluorescent bulb installed.
Each fixture plus bulb combination cost $8.48.


The accidental advantages of this lamp-fixture combination are cooler operating temperature, lower electrical consumption and longer bulb life. Works for me.

To create a seamless background, I used a 30 inch x 40 inch photo mounting board that I had on hand. Mounting board not only provides the seamless background effect I wanted, but allows me to quickly change background colors as the picture requires. Fixing the mounting board in place was a breeze when I realized the carpenter clamps in my garage would snap in place on the edges of my photo table to securely hold the board without marring the board or table surfaces.


You guessed it. I originally bought my carpenter clamps from Home Depot as well.

I have light stands, but only one resides in my computer darkroom. So, I used furniture at hand to provide additional supports. You won't believe what I eventually found most useful for this purpose.


Table top studio in action.

Here's the final product. By clamping the mounting board to my table top edge and curving the board to lay against the back wall, I created a working table top studio that I could quickly change to accommodate any small object. By the way, that light stand holding the high key light on the left is a wire-framed bar stool.

My out of pocket cost for this Home Depot Studio was $25.44 plus some odds and ends I had in my workshop. I use scrap white mounting board pieces when I need to add some reflected bounce light. Because I'm using solid colored mounting boards in a seamless arrangement, retouching and masking in Photoshop is a snap. (Usually the magic wand tool in Photoshop is good enough to completely mask out the background.)

Note: Because these are fluorescent bulbs, allow a couple of minutes for the bulbs to warm up to their full intensity. Also make sure you purchase the daylight balanced version.

It's true that we are slaves to an expensive hobby. However, there are ways of minimizing the cost without negatively impacting the quality of our photography.

If you have similar do-it-yourself cost savings tips for your fellow photographers, I'd love to hear about them. I'm sure someone out there is getting creative with duct tape. If you have any questions or comments, you know where to find me.